Pointillate Image --- using Tk 'photo' image files (GIF,PGM,PPM,PNG)
uniquename - 2013aug22
About 4 to 7 years ago, I used the 'Irfanview' image editor program which had a capability to make a 'pointillated' image from an image file --- so that the original image looked like it had been converted to an Impressionist painting, by Cezanne or Van Gogh or one of that 'school' of painting.
It has been on my 'to do' list for about 10 months to make a Tk canvas GUI utility that could do the same thing.
The Tk 'image create photo -file' command will accept image data of several types of 'raster image' files --- GIF, PGM (Portable Gray Map), PPM (Portable Pixel Map), and, starting with Tk 8.6, PNG.
Since I am using Tk 8.5 (and PGM and PPM files are hardly used at all nowadays), I was satisfied to aim at doing 'pointillations' of GIF files.
GOALS FOR THE GUI
For the GUI, I needed (or wanted) several features:
1) an entry field for filename, along with a 'Browse...' button --- to use to fetch a filename via the 'tk_getOpenFile' utility.
2) a canvas on which to display the image --- as a 'preview'.
3) the option to use either ovals or rectangles to make the 'points' or 'dabs' of color.
4) the option to choose the size (in pixels) of the dabs --- both width and height.
5) a button to use to initiate a 'pointillation' of the image file.
6) a label on the GUI in which to display the dimensions of the image file.
7) a Help button on the GUI, by which to provide information on the extent of the capabilities of this utility
SCREENSHOT OF THE GUI
I set about making such a GUI, and after several iterations (including adding a checkbutton to allow for outlines, or not, around the 'dabs'), I ended up with the GUI seen in the following image.
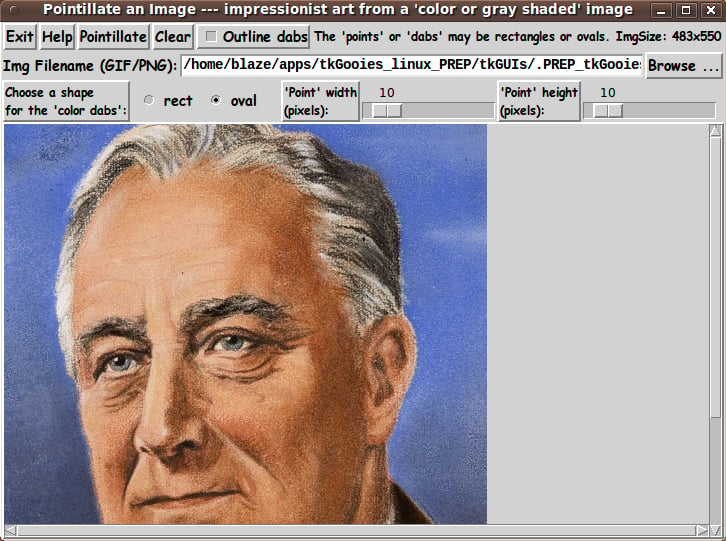
When the GUI first comes up, the canvas is empty. Since pointillism tends to work well on portraits, I found this portrait image and used it for testing.
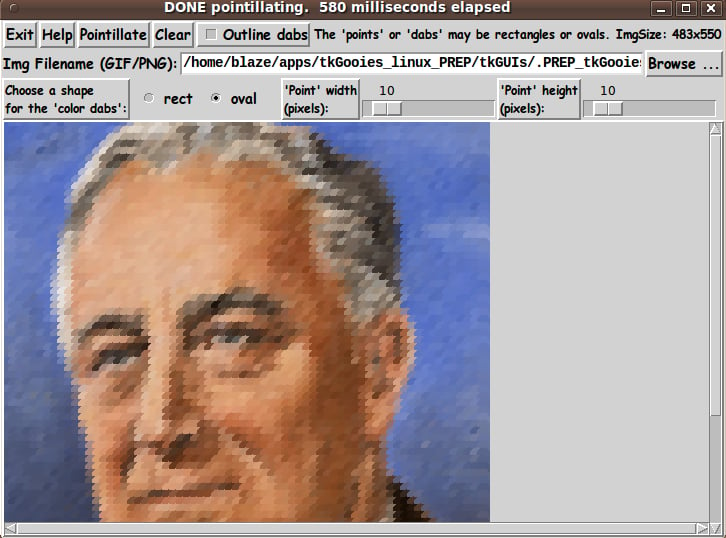
Initially, the GUI is defaulted to draw 'ovals' and to use 10x10 pixel ovals, with no outlines. Here is what I got from the image above, by clicking on the 'Pointillate' button.
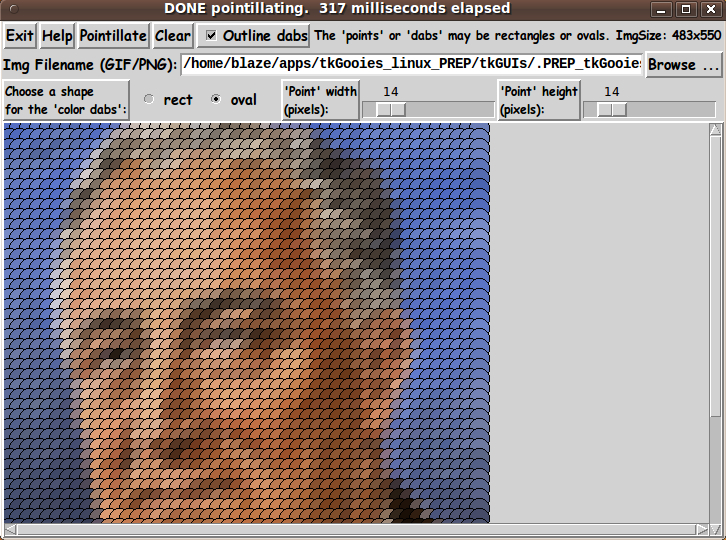
I set the size up to 14x14 and turned on the 'Outline' checkbutton. Another click on the 'Pointillate' button yielded the following image.
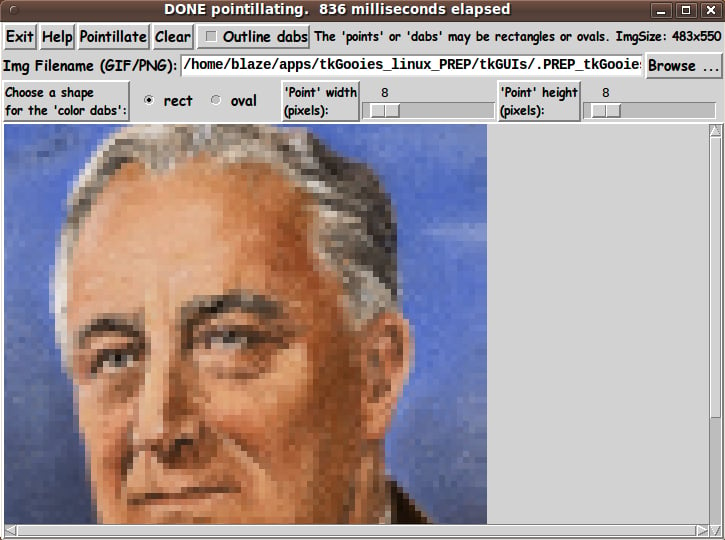
And to show what the image looks like when using 'rectangles' instead of 'ovals', here is what I got with size set to 8x8 and outlines turned off.
Note that although the image from the file was put on the Tk canvas with a 'create image' canvas command, the 'dabs' are applied over that image with the 'create oval' and 'create rectangle' commands.
CAPTURING THE GENERATED IMAGE
When you get an image that you want to save, a screen/window capture utility (like 'gnome-screenshot' on Linux) can be used to capture the GUI image in a PNG or GIF file, say.
If necessary, an image editor (like 'mtpaint' on Linux) can be used to crop the window capture image. The image could also be down-sized --- say to make an icon or 'button' image file.
The 'Help' button on the GUI provides pretty complete and detailed help for using the GUI --- including some of the information in the paragraphs above.
THE CODE
Below, I provide the Tk script code for this 'pointillate-an-image' utility.
I follow my usual 'canonical' structure for Tk code for this Tk script:
  0) Set general window & widget parms (win-name, win-position,
     win-color-scheme, fonts, widget-geometry-parms, win-size-control,
     text-array-for-labels-etc).

  1a) Define ALL frames (and sub-frames, if any).
  1b) Pack   ALL frames and sub-frames.

  2) Define & pack all widgets in the frames, frame by frame.
              Within each frame, define ALL the widgets.
              Then pack the widgets.

  3) Define keyboard and mouse/touchpad/touch-sensitive-screen action
     BINDINGS, if needed.

  4) Define PROCS, if needed.

  5) Additional GUI initialization (typically with one or more of
     the procs), if needed.
This Tk coding structure is discussed in more detail on the page A Canonical Structure for Tk Code --- and variations.
This structure makes it easy for me to find code sections --- while generating and testing a Tk script, and when looking for code snippets to include in other scripts (code re-use).
I call your attention to step-zero. One new thing that I have started doing recently is using a text-array for text in labels, buttons, and other widgets in the GUI. This can make it easier for people to internationalize my scripts. I will be using a text-array like this in most of my scripts in the future.
Experimenting with the GUI
As in all my scripts that use the 'pack' geometry manager (which is all of my 100-plus scripts, so far), I provide the four main pack parameters --- '-side', '-anchor', '-fill', '-expand' --- on all of the 'pack' commands for the frames and widgets.
That helps me when I am initially testing the behavior of a GUI (the various widgets within it) as I resize the main window.
I think that I have used a nice choice of the 'pack' parameters. The label, button, radiobutton, checkbutton, and scale widgets stay fixed in size and relative-location as the window is re-sized --- the filename entry field x-expands whenever the window is x-expanded --- while the canvas area (with its scroll bars) expands/contracts whenever the window is re-sized.
You can experiment with the '-side', '-anchor', '-fill', and '-expand' parameters on the 'pack' commands for the various frames and widgets --- to get the widget behavior that you want.
___
Additional experimentation: You might want to change the fonts used for the various GUI widgets. For example, you could change '-weight' from 'bold' to 'normal' --- or '-slant' from 'roman' to 'italic'. Or change font families.
In fact, you may NEED to change the font families, because the families I used may not be available on your computer --- and the default font that the 'wish' interpreter chooses may not be very pleasing.
I use variables to set geometry parameters of widgets --- parameters such as border-widths and padding. And I have included the '-relief' parameter on the definitions of frames and widgets. Feel free to experiment with those 'appearance' parameters as well.
Some features in the code
That said, here's the code --- with plenty of comments to describe what most of the code-sections are doing.
You can look at the top of the PROCS section of the code to see a list of the procs used in this script, along with brief descriptions of how they are called and what they do.
The procs are
   'get_img_filename' - called by the 'Browse...' button,
                        to get the filename of an image (GIF,PNG,...) file
                        and
                        then place the image on the canvas.

   'put_img_on_canvas' - called by proc 'get_img_filename' (and perhaps
                         by some bindings), to place the image on the
                         canvas, for the current filename

  'pointillate_img'   - called by the 'Pointillate' button,
                        to 'stride' over the image and create the
                        'dabs' of color over the image --- by using
                        the canvas 'create oval' or 'create rect' command.
                        (See the commented code for details.)

  'popup_msgVarWithScroll' - called by the 'Help' button,
                             to show text in variable $HELPtext.
It is my hope that the copious comments in the code will help Tcl-Tk coding 'newbies' get started in making GUI's like this.
Without the comments, potential young Tcler's might be tempted to return to their iPhones and iPads and iPods --- to watch videos of cliff jumpers parasailing into the sides of cliffs, and bouncing down to the canyon below.
Code for Tk script 'pointillate_image.tk' :
#!/usr/bin/wish -f
##+###########################################################################
##
## SCRIPT: pointillate_image.tk
##
## PURPOSE: This script serves to create 'pointillated' images from a
##          user-selected image file.
##
##          The image file may be a GIF file when using 8.5.x (or earlier)
##          versions of the Tk 'wish' interpreter --- and PNG, when using
##          8.6.x versions of the 'wish' interpreter.
##
##          A user-selected image file is loaded onto a Tk 'canvas' widget
##          with a 'create image' command.  A 'pointillation' of the image
##          is created on top of the image via 'create rectangle' or
##          'create oval' Tk commands. ('create polygon' and 'create line'
##          commands may be an option in the future.)
##
##          The pointillation can be controlled by various 'control widgets'
##          on the GUI. For example:
##             - checkbuttons to choose between rectangles and ovals
##             - scale widget(s) to control the size of the rectangles/ovals
##
##          The user has operating options such as:
##              - clearing the pointillation (rectangles/ovals) to reveal
##                the original image and try again.
##
##          Eventually, we may add some options for finer control, such as:
##
##          Individual instances of the pointillation (rectangles,
##          ovals, polygons, lines) can be 'manually' moved/deleted via mouse
##          actions.
##
## THE GUI DESIGN:
##
##   This 'pointillate' script provides a Tk GUI with the following widgets.
##
##         1) A *BUTTONS FRAME* which contains 'Exit' and 'Help' and
##            'Pointillate' buttons.
##
##         2) A *FILENAME FRAME* containing a LABEL, a FILENAME ENTRY FIELD,
##            and a 'Browse ...' BUTTON with which to get an image file
##            to place on the canvas widget of this GUI.
##
##         3) A *CONTROLS FRAME* that includes widgets such as:
##            a) CHECKBUTTONS to choose between rectangles and ovals.
##            b) TWO SCALES --- to specify rectangle or oval sizes, in
##               x and y directions.
##
##         4) A *CANVAS FRAME*, in which the canvas lies, onto which
##            the user-selected photo-file image is loaded and onto which
##            the pointillism objects are drawn.
##
##+#######################################################################
## 'CANONICAL' STRUCTURE OF THIS CODE:
##
##  0) Set general window/widget parms (win-name, win-position,
##     win-color-scheme, fonts, widget-geometry-parms, win-size-control,
##     text-array-for-labels-etc).
##  1a) Define ALL frames (and sub-frames, if any).
##  1b) Pack   ALL frames and sub-frames (that are to show inititally).
##
##  2) Define & pack all widgets in the frames, frame-by-frame.
##     When ALL the widgets for a frame are defined, pack ALL the widgets.
##
##  3) Define key and mouse/touchpad/touch-sensitive-screen 'event'
##     BINDINGS, if needed.
##
##  4) Define PROCS, if needed.
##
##  5) Additional GUI INITIALIZATION (typically with one or more of
##     the procs), if needed.
##
##+#################################
## Some detail of the code structure of this particular script:
##
##  1a) Define ALL frames:
##
##   Top-level :
##    'fRbuttons'    - to contain several buttons and a couple of radiobuttons
##    'fRfile'       - to contain a listbox and its scrollbars
##    'fRcontrols'   - to contain some radiobutton and scale widgets
##    'fRcanvas'     - to contain an canvas widget.
##
##   Sub-frames : none
##
##  1b) Pack ALL frames.
##
##  2) Define & pack all widgets in the frames -- basically going through
##     frames & their interiors in  left-to-right, top-to-bottom order:
##
##  3) Define bindings:
##         - Button1-release on the filename entry widget (?)
##         - Return key press on the filename entry widget (?)
##
##  4) Define procs:
##        - a proc to get the image filename
##        - a proc to perform the 'pointillation' of the image for
##          the current control settings
##        - a proc to show 'help' text
##
##  5) Additional GUI initialization: the canvas is left empty ;
##          the user needs to select an image-file.
##
##+#######################################################################
## DEVELOPED WITH: Tcl-Tk 8.5 on Ubuntu 9.10 (2009-october, 'Karmic Koala')
##
##   $ wish
##   % puts "$tcl_version $tk_version"
##
## showed
##     8.5 8.5
## but this script should work in most previous 8.x versions, and probably
## even in some 7.x versions (if font handling is made 'old-style').
##+#######################################################################
## MAINTENANCE HISTORY:
## Started by: Blaise Montandon 2013aug09 Started laying out the GUI.
## Changed by: Blaise Montandon 20.......
##+########################################################################


##+#######################################################################
## Set WINDOW TITLE and POSITION.
##+#######################################################################

wm title    . \
   "Pointillate an Image --- impressionist art from a 'color or gray shaded' image"
wm iconname . "Pointillate"

wm geometry . +15+30


##+######################################################
## Set the COLOR SCHEME for the window and its widgets ---
## such as entry field background color.
##+######################################################

# set Rpal255 200
# set Gpal255 200
# set Bpal255 255
set Rpal255 210
set Gpal255 210
set Bpal255 210

set hexPALcolor [format "#%02X%02X%02X" $Rpal255 $Gpal255 $Bpal255]

tk_setPalette "$hexPALcolor"

## Set color background for some widgets.

set entryBKGD "#ffffff"
# set listboxBKGD "#ffffff"

set radbuttBKGD "#c0c0c0"
set chkbuttBKGD "#c0c0c0"

set textBKGD    "#f0f0f0"


##+########################################################
## Set (temporary) FONT-NAMES.
##
## We use a VARIABLE-WIDTH font for text on LABEL and
## BUTTON widgets.
##
## We use a FIXED-WIDTH font for text in ENTRY, LISTBOX,
## and TEXT widgets.
##+########################################################

font create fontTEMP_varwidth \
   -family {comic sans ms} \
   -size -14 \
   -weight bold \
   -slant roman

font create fontTEMP_SMALL_varwidth \
   -family {comic sans ms} \
   -size -12 \
   -weight bold \
   -slant roman

## Some other possible (similar) variable width fonts:
##  Arial
##  Bitstream Vera Sans
##  DejaVu Sans
##  Droid Sans
##  FreeSans
##  Liberation Sans
##  Nimbus Sans L
##  Trebuchet MS
##  Verdana

font create fontTEMP_fixedwidth  \
   -family {liberation mono} \
   -size -14 \
   -weight bold \
   -slant roman

font create fontTEMP_SMALL_fixedwidth  \
   -family {liberation mono} \
   -size -12 \
   -weight bold \
   -slant roman

## Some other possible fixed width fonts (esp. on Linux):
##  Andale Mono
##  Bitstream Vera Sans Mono
##  Courier 10 Pitch
##  DejaVu Sans Mono
##  Droid Sans Mono
##  FreeMono
##  Nimbus Mono L
##  TlwgMono


##+###########################################################
## SET GEOM VARS FOR THE VARIOUS WIDGET DEFINITIONS.
## (e.g. width and height of canvas, and padding for Buttons)
##+###########################################################

set initCanWidthPx 300
set initCanHeightPx 400

set minCanWidthPx 24
set minCanHeightPx 24

# set BDwidthPx_canvas 2
  set BDwidthPx_canvas 0


## BUTTON widget geom settings:

set PADXpx_button 0
set PADYpx_button 0
set BDwidthPx_button 2


## LABEL geom parameters:

set PADXpx_label 0
set PADYpx_label 0
set BDwidthPx_label 2


## ENTRY widget geom settings:

set BDwidthPx_entry 2
set initEntryWidthChars 20


## LISTBOX geom settings:

# set BDwidthPx_listbox 2
# set initListboxWidthChars 30
# set initListboxHeightChars 8


## RADIOBUTTON geom parameters:

set PADXpx_radbutt 0
set PADYpx_radbutt 0
set BDwidthPx_radbutt 2


## CHECKBUTTON geom parameters:

set PADXpx_chkbutt 0
set PADYpx_chkbutt 0
set BDwidthPx_chkbutt 2


##+######################################################
## Set a MINSIZE of the window (roughly).
##
## For WIDTH, allow for a minwidth of the '.fRbuttons' frame:
##            about 3 buttons (Exit,Help,Pointillate), at least.
##
## For HEIGHT, allow
##             2 chars  high for the '.fRbuttons' frame
##             1 char   high for the '.fRfile' frame
##             1 char   high for the '.fRcontrols' frame
##            24 pixels high for the '.fRcanvas' frame.
##+######################################################
## We allow the window to be resizable and we pack the canvas with
## '-fill both -expand 1' so that the canvas can be enlarge according
## to the size of the image loaded.
##########################################################################

set minWinWidthPx [font measure fontTEMP_varwidth \
   " Exit  Help  Pointillate  Clear "]

## Add some pixels to account for right-left-side window decoration
## (about 8 pixels), about 4 widgets x 4 pixels/widget for borders/padding
## for 4 widgets --- 4 buttons.

set minWinWidthPx [expr {24 + $minWinWidthPx}]


## MIN HEIGHT ---
##             2 chars  high for the '.fRbuttons' frame
##             1 char   high for the '.fRfile'    frame
##             1 char   high for the '.fRcontrols' frame
##            24 pixels high for the '.fRcanvas' frame.

set CharHeightPx [font metrics fontTEMP_varwidth -linespace]

set minWinHeightPx [expr {24 + (4 * $CharHeightPx)}]

## Add about 28 pixels for top-bottom window decoration. Also add
## about 4 frames x 4 pixels/frame for the 4 stacked frames
## and their widgets (their borders/padding).

set minWinHeightPx [expr {44 + $minWinHeightPx}]

## FOR TESTING:
#   puts "minWinWidthPx = $minWinWidthPx"
#   puts "minWinHeightPx = $minWinHeightPx"

wm minsize . $minWinWidthPx $minWinHeightPx


## If you want to make the window un-resizable,
## you can use the following statement.
# wm resizable . 0 0


#######################################################################
## Set a TEXT-ARRAY to hold text for buttons & labels on the GUI.
##     NOTE: This can aid INTERNATIONALIZATION. This array can
##           be set according to a nation/region parameter.
#######################################################################

## if { "$VARlocale" == "en"}

set aRtext(buttonEXIT) "Exit"
set aRtext(buttonHELP) "Help"
set aRtext(buttonDRAW) "Pointillate"
set aRtext(buttonCLEAR) "Clear"
set aRtext(chkbuttOUTLINE) "Outline dabs"

set aRtext(labelINFO) "The 'points' or 'dabs' may be rectangles or ovals."

set aRtext(labelFILE)    "Img Filename (GIF/PNG):"
set aRtext(buttonBROWSE)  "Browse ..."


set aRtext(labelRADBUTTS) "Choose a shape
for the 'color dabs':"

set aRtext(radbuttRECT) "rect"
set aRtext(radbuttOVAL) "oval"
# set aRtext(radbuttPOLY) "poly6"
# set aRtext(radbuttLINE) "line"

set aRtext(labelSCALEW)  "'Point' width
(pixels):"
set aRtext(labelSCALEH)  "'Point' height
(pixels):"


## END OF  if { "$VARlocale" == "en"}


##+################################################################
## DEFINE *ALL* THE FRAMES:
##
##   Top-level : '.fRbuttons'  '.fRfile'  '.fRcontrols'  'fRcanvas'
##
##   Sub-frames: none
##+################################################################

## FOR TESTING:
# set RELIEF_frame raised
# set BDwidth_frame 2

set RELIEF_frame flat
set BDwidth_frame 0


frame .fRbuttons  -relief $RELIEF_frame  -borderwidth $BDwidth_frame

frame .fRfile     -relief $RELIEF_frame  -borderwidth $BDwidth_frame

frame .fRcontrols -relief $RELIEF_frame  -borderwidth $BDwidth_frame

frame .fRcanvas   -relief raised         -borderwidth 2


##+##############################
## PACK the FRAMES.
##+##############################

pack .fRbuttons \
   -side top \
   -anchor nw \
   -fill x \
   -expand 0

pack .fRfile \
   -side top \
   -anchor nw \
   -fill x \
   -expand 0

pack .fRcontrols \
   -side top \
   -anchor nw \
   -fill x \
   -expand 0

pack .fRcanvas \
   -side top \
   -anchor nw \
   -fill both \
   -expand 1


##+#########################################################
## All frames are defined and packed.
## Now we are ready to define the widgets in the frames.
##+#########################################################


##+#####################################################################
## In the '.fRbuttons' FRAME  -
## DEFINE BUTTONS (Exit, Help, Pointillate).
##+#####################################################################

button .fRbuttons.buttEXIT \
   -text "$aRtext(buttonEXIT)" \
   -font fontTEMP_varwidth \
   -padx $PADXpx_button \
   -pady $PADYpx_button \
   -relief raised \
   -bd $BDwidthPx_button \
   -command {exit}

button .fRbuttons.buttHELP \
   -text "$aRtext(buttonHELP)" \
   -font fontTEMP_varwidth \
   -padx $PADXpx_button \
   -pady $PADYpx_button \
   -relief raised \
   -bd $BDwidthPx_button \
   -command {popup_msgVarWithScroll .topHelp "$HELPtext"}

button .fRbuttons.buttDRAW \
   -text "$aRtext(buttonDRAW)" \
   -font fontTEMP_varwidth \
   -padx $PADXpx_button \
   -pady $PADYpx_button \
   -relief raised \
   -bd $BDwidthPx_button \
   -command {pointillate_image}

button .fRbuttons.buttCLEAR \
   -text "$aRtext(buttonCLEAR)" \
   -font fontTEMP_varwidth \
   -padx $PADXpx_button \
   -pady $PADYpx_button \
   -relief raised \
   -bd $BDwidthPx_button \
   -command {.fRcanvas.can delete TAGrect ; .fRcanvas.can delete TAGoval}

set OUTLINE0or1 0

checkbutton .fRbuttons.chkbuttOUTLINE \
   -text "$aRtext(chkbuttOUTLINE)" \
   -font fontTEMP_varwidth \
   -padx $PADXpx_chkbutt \
   -pady $PADYpx_chkbutt \
   -bd $BDwidthPx_chkbutt \
   -variable OUTLINE0or1 \
   -selectcolor "$chkbuttBKGD" \
   -relief raised

label .fRbuttons.labelINFO \
   -text "$aRtext(labelINFO)" \
   -font fontTEMP_SMALL_varwidth \
   -justify left \
   -anchor w \
   -relief flat \
   -bd $BDwidthPx_label

label .fRbuttons.labelIMGSIZE \
   -text "" \
   -font fontTEMP_SMALL_varwidth \
   -justify left \
   -anchor w \
   -relief flat \
   -bd $BDwidthPx_label


##+#############################################
## Pack ALL the widgets in the 'fRbuttons' frame.
##+#############################################

pack .fRbuttons.buttEXIT \
     .fRbuttons.buttHELP \
     .fRbuttons.buttDRAW \
     .fRbuttons.buttCLEAR \
     .fRbuttons.chkbuttOUTLINE \
     .fRbuttons.labelINFO \
   -side left \
   -anchor w \
   -fill none \
   -expand 0

pack .fRbuttons.labelIMGSIZE \
   -side right \
   -anchor e \
   -fill none \
   -expand 0


##+###############################
## In FRAME '.fRfile' -
## DEFINE-and-PACK 3 widgets -
## LABEL, ENTRY, BUTTON:
##+###############################

label .fRfile.labelFILE \
   -text "$aRtext(labelFILE)" \
   -font fontTEMP_varwidth \
   -justify left \
   -anchor w \
   -relief flat \
   -bd 0

set ENTRYfilename ""

entry .fRfile.entFILENAME \
   -textvariable ENTRYfilename \
   -bg $entryBKGD \
   -font fontTEMP_fixedwidth \
   -width $initEntryWidthChars \
   -relief sunken \
   -bd $BDwidthPx_entry

button .fRfile.buttBROWSE \
   -text "$aRtext(buttonBROWSE)" \
   -font fontTEMP_varwidth \
   -padx $PADXpx_button \
   -pady $PADYpx_button \
   -relief raised \
   -bd $BDwidthPx_button \
   -command {get_img_filename}


## Pack the widgets in frame '.fRfile'.

pack .fRfile.labelFILE \
   -side left \
   -anchor w \
   -fill none \
   -expand 0

pack .fRfile.entFILENAME \
   -side left \
   -anchor w \
   -fill x \
   -expand 1

pack .fRfile.buttBROWSE \
   -side left \
   -anchor w \
   -fill none \
   -expand 0


##+###################################################
## In FRAME '.fRcontrols' -
## DEFINE-and-PACK 'CONTROL' WIDGETS ---
## RADIOBUTTONS and 2 LABEL-and-SCALE widget pairs.
##+###################################################

label .fRcontrols.labelRADBUTTS \
   -text "$aRtext(labelRADBUTTS)" \
   -font fontTEMP_SMALL_varwidth \
   -justify left \
   -anchor w \
   -relief raised \
   -bd $BDwidthPx_button

## The 'VARshape' variable is used for these radiobuttons.

set VARshape "oval"

radiobutton .fRcontrols.radbuttRECT \
   -text "$aRtext(radbuttRECT)" \
   -font fontTEMP_varwidth \
   -anchor w \
   -variable VARshape \
   -value "rect" \
   -selectcolor "$radbuttBKGD" \
   -relief flat \
   -bd $BDwidthPx_radbutt

radiobutton .fRcontrols.radbuttOVAL \
   -text "$aRtext(radbuttOVAL)" \
   -font fontTEMP_varwidth \
   -anchor w \
   -variable VARshape \
   -value "oval" \
   -selectcolor "$radbuttBKGD" \
   -relief flat \
   -bd $BDwidthPx_radbutt


## DEFINE LABEL-and-SCALE for Point-WIDTH.

label .fRcontrols.labelWIDTH \
   -text "$aRtext(labelSCALEW)" \
   -font fontTEMP_SMALL_varwidth \
   -justify left \
   -anchor w \
   -relief raised \
   -bd $BDwidthPx_label

set dabWIDTHpx 10

scale .fRcontrols.scaleWIDTH \
   -orient horizontal \
   -resolution 1 \
   -from 1 -to 100 \
   -length 100px \
   -variable dabWIDTHpx


## DEFINE LABEL-and-SCALE for Point-HEIGHT.

label .fRcontrols.labelHEIGHT \
   -text "$aRtext(labelSCALEH)" \
   -font fontTEMP_SMALL_varwidth \
   -justify left \
   -anchor w \
   -relief raised \
   -bd $BDwidthPx_label

set dabHEIGHTpx 10

scale .fRcontrols.scaleHEIGHT \
   -orient horizontal \
   -resolution 1 \
   -from 1 -to 100 \
   -length 100px \
   -variable dabHEIGHTpx


## Pack the control widgets.

pack .fRcontrols.labelRADBUTTS \
     .fRcontrols.radbuttRECT \
   -side left \
   -anchor w \
   -fill none \
   -expand 0

pack .fRcontrols.radbuttOVAL \
   -side left \
   -anchor w \
   -fill none \
   -expand 0 \
   -padx {0 20}

pack .fRcontrols.labelWIDTH \
     .fRcontrols.scaleWIDTH \
     .fRcontrols.labelHEIGHT \
     .fRcontrols.scaleHEIGHT \
   -side left \
   -anchor w \
   -fill none \
   -expand 0


##+###############################
## In FRAME '.fRcanvas' -
## DEFINE-and-PACK a CANVAS WIDGET:
##+######################################################
## We set '-highlightthickness' and '-borderwidth' to
## zero, to avoid covering some of the viewable area
## of the canvas, as suggested on page 558 of the 4th
## edition of 'Practical Programming with Tcl and Tk'.
##+######################################################

canvas .fRcanvas.can \
   -width $initCanWidthPx \
   -height $initCanHeightPx \
   -relief flat \
   -highlightthickness 0 \
   -borderwidth 0 \
   -yscrollcommand ".fRcanvas.scrbary set" \
   -xscrollcommand ".fRcanvas.scrbarx set"

scrollbar .fRcanvas.scrbary \
   -orient vertical -command ".fRcanvas.can yview"

scrollbar .fRcanvas.scrbarx \
   -orient horizontal -command ".fRcanvas.can xview"


## Pack the widgets in frame 'fRcanvas'.
## (Pack the scrollbars before the canvas so that
##  the canvas does not fill the available area first.)

pack .fRcanvas.scrbary \
   -side right \
   -anchor e \
   -fill y \
   -expand 0

pack .fRcanvas.scrbarx \
   -side bottom \
   -anchor sw \
   -fill x \
   -expand 0

pack .fRcanvas.can \
   -side top \
   -anchor nw \
   -fill both \
   -expand 1


##+##################################################
## END OF DEFINITION of the GUI widgets.
##+##################################################
## Start of BINDINGS, PROCS, Added-GUI-INIT sections.
##+##################################################

##+#######################################################################
##+#######################################################################
##  BINDINGS SECTION:
##   - For MB1-release in the img filename entry field,
##             use $ENTRYfilename to put the img on the canvas.
##   - For Enter-key-press in the img filename entry field,
##             use $ENTRYfilename to put the img on the canvas.
##
## DE-ACTIVATED, for now.
##   We do the putting of the image on the canvas in the
##   'get_img_filename' proc, for speed.
##+#######################################################################

## We use this 'if' statement to de-activate these 2 bindings.
if {0} {

bind .fRfile.entFILENAME <ButtonRelease-1>  {
   put_img_on_canvas
}

bind .fRfile.entFILENAME <Return>  {
   put_img_on_canvas
}

}
##END OF if {0}


##+##################################################################
##+##################################################################
## DEFINE PROCS SECTION:
##
##   'get_img_filename'    - called by the 'Browse...' button,
##                           to get the filename of an image (GIF/PNG)
##                           file and place the image on the canvas
##
##   'put_img_on_canvas'   -  called by the 'get_img_filename' proc,
##                            to make a 'photo' image structure from
##                            the specified image file and then put
##                            the image on the canvas.
##
##   'pointillate_image'   - called by the 'Pointillate' button,
##                           to pointillate the image according to the
##                           shape and size control settings of the GUI.
##
##  - popup_msgVarWithScroll  - called by the 'Help' button,
##                              to show the text in the var $HELPtext.
##
##+#################################################################


##+#########################################################################
## proc 'get_img_filename' -
##
## PURPOSE: To get the name of an image file (GIF/PNG) and put the
##          filename into global var 'ENTRYfilename'.
##
## CALLED BY: the '-command' option of the 'Browse ...' button.
##+#########################################################################

# set curDIR "$env(HOME)"
  set curDIR [pwd]

proc get_img_filename {} {

   global ENTRYfilename env curDIR aRtext
   # global img1

   ## Provide file selector to get the name of an image file.

   set fName [tk_getOpenFile -parent . -title "$aRtext(labelFILE)" \
      -initialdir "$curDIR" ]

   ## FOR TESTING:
   #   puts "get_img_filename  > fName : $fName"

   if {"$fName" == ""} {return}

   ## If the filename returned exists, put the name in the entry variable
   ## and put the directory name in the curDIR variable.
   ## Also go ahead, create a 'photo' image structure and
   ## put the image on the canvas.

   if {[file exists $fName]} {

      set ENTRYfilename "$fName"
      set CURdir [ get_chars_before_last / in "$ENTRYfilename" ]

      put_img_on_canvas

   }
}
## END OF proc 'get_img_filename'


#########################################################################
## Proc 'get_chars_before_last' -
#########################################################################
## INPUT:  A character and a string.
##         Note: The "in" parameter is there only for clarity.
##
## OUTPUT: Returns all of the characters in the string "strng" that
##         are BEFORE the last occurence of the characater "char".
##
## EXAMPLE CALL: To extract the directory from a fully qualified file name:
##
## set directory [ get_chars_before_last "/" in "/home/abc01/junkfile" ]
##
##      $directory will now be the string "/home/abc01"
##
#########################################################################

proc get_chars_before_last { char in strng } {

   set endIDX [ expr [string last $char $strng ] - 1 ]
   set output [ string range $strng 0 $endIDX ]

   ## FOR TESTING:
   # puts "From 'get_chars_before_last' proc:"
   # puts "STRING: $strng"
   # puts "CHAR: $char"
   # puts "RANGE up to LAST CHAR - start: 0   endIDX: $endIDX"

   return $output

}
## END OF 'get_chars_before_last' PROCEDURE


##+######################################################################
## proc 'put_img_on_canvas':
##
## PURPOSE: Makes a 'photo' image structure from the specified image file
##          and puts the image on the canvas.
##
## CALLED BY: the 'get_img_filename' proc
#########################################################################

proc put_img_on_canvas { } {

   global ENTRYfilename

   ## If there is an existing 'photo' structure named 'img1', delete it.

   if {[info exists img1]} {image delete img1}

   ## Create an 'img1' 'photo' structure from the current img filename.

   image create photo img1 -file "$ENTRYfilename"
   # set img1 [image create photo -file "$ENTRYfilename"]

   ## FOR TESTING:
   #  puts "put_img_on_canvas > img1: $img1"

   ## Clear any previous image off the canvas, before
   ## displaying the next one on the canvas.

   .fRcanvas.can delete all

   ## Put the 'img1' structure on the canvas.

   .fRcanvas.can create image 0 0 -anchor nw -image img1

   ## Put image size on a label.

   set imgWIDTHpx  [image width  img1]
   set imgHEIGHTpx [image height img1]
   .fRbuttons.labelIMGSIZE configure \
      -text "ImgSize: ${imgWIDTHpx}x$imgHEIGHTpx"

   ## Make the canvas scrollbars usable for large images.

   .fRcanvas.can configure -scrollregion "0 0 $imgWIDTHpx $imgHEIGHTpx"

}
## END OF proc 'put_img_on_canvas'


##+######################################################################
## proc 'pointillate_image':
##
## PURPOSE: Pointillates the image according to the
##          shape and size control settings.
##
##          Uses 'create rectangle' or 'create oval' on the canvas.
##
##          We use a double loop over y and x to get average image colors
##          to use for the rectangles/ovals.
##
## CALLED BY: the 'Pointillate' button
##+######################################################################

proc pointillate_image {} {

   global ENTRYfilename dabWIDTHpx dabHEIGHTpx VARshape OUTLINE0or1
   # global img1

   if {"$ENTRYfilename" == ""} {return}
   # if {![info exists img1]} {return}

   ## FOR TESTING:
   #   puts "pointillate_image >  Starting to pointillate img1: $img1"

   #####################################################
   ## Clear the canvas of previous ovals or rectangles.
   #####################################################
   .fRcanvas.can delete TAGrect
   .fRcanvas.can delete TAGoval

   #########################################################
   ## Signal the start of processing, somewhere on the GUI.
   #########################################################

   wm title . "*BUSY* ... Pointillating the image."

   # .fRcanvas.can create text 10 10 -anchor nw \
   #   -text "Starting processing." -tag TAGcanmsg


   ##################################################
   ## Set the current time, for determining execution
   ## time for building the pointillated image, below.
   ##################################################

   set t0 [clock milliseconds]

   ################################################
   ## Change the cursor to a 'watch' cursor.
   ################################################
   . config -cursor watch
   ## Make the cursor visible.
   update

   ## Get width & height of the img1 structure.
   set imgWIDTHpx  [image width img1]
   set imgHEIGHTpx [image height img1]

   ## Set vars for 1-less-than width & height of the img1 structure.
   set imgWIDTHpx1  [expr {$imgWIDTHpx - 1}]
   set imgHEIGHTpx1 [expr {$imgHEIGHTpx - 1}]

   ######################################################
   ## Set a horizontal and vertical 'stride' to use as
   ## we plot the oval or rectangular 'dabs' on the image.
   ## Make the x,y strides less than the x,y-size of the 'dabs'.
   ######################################################

   set strideXpx [expr {int(0.75 * $dabWIDTHpx)}]
   set strideYpx [expr {int(0.75 * $dabHEIGHTpx)}]

   ## Set starting x,y values for the striding.
   set init_strideXpx [expr {int(0.5 * $strideXpx)}]
   set init_strideYpx [expr {int(0.5 * $strideYpx)}]

   ## Set a distance for sampling colors at 4 corners
   ## around a current x,y stride location.
   set corners_strideXpx [expr {int(0.4 * $strideXpx)}]
   set corners_strideYpx [expr {int(0.4 * $strideYpx)}]


   ##################################################
   ## Start 'striding' over the HEIGHT of the image.
   ##################################################

   for {set y $init_strideYpx} {$y < $imgHEIGHTpx} {incr y $strideYpx} {

      ##FOR TESTING: (show a msg on the canvas about the row-number being processed)
      # .fRcanvas.can delete tag TAGcanmsg
      # .fRcanvas.can create text 10 10 -anchor nw \
      #     -font fontTEMP_fixedwidth \
      #     -text "Processing row y: [expr $y + 1] on img of height $imgHEIGHTpx" \
      #     -tag TAGcanmsg
      ## Make the msg visible.
      # update

      ###################################################
      ## For the current stride-height level,
      ## 'stride' over the WIDTH of the image, to draw
      ## 'dabs' centered at x-stride,y-stride points.
      ###################################################

      for {set x $init_strideXpx} {$x < $imgWIDTHpx} {incr x $strideXpx} {

         ###############################################################
         ## Sample the color at the center pixel and at 4 'corner pixels'
         ## less than half the x,y stride from the center.
         ###############################################################

         foreach {r0 g0 b0} [img1 get $x $y] break

         set x1 [expr {$x + $corners_strideXpx}]
         if {$x1 > $imgWIDTHpx1} {set x1 $imgWIDTHpx1}
         set y1 [expr {$y + $corners_strideXpx}]
         if {$y1 > $imgHEIGHTpx1} {set y1 $imgHEIGHTpx1}
         foreach {r1 g1 b1} [img1 get $x1 $y1] break

         set x1 [expr {$x - $corners_strideXpx}]
         if {$x1 < 0} {set x1 0}
         set y1 [expr {$y + $corners_strideXpx}]
         if {$y1 > $imgHEIGHTpx1} {set y1 $imgHEIGHTpx1}
         foreach {r2 g2 b2} [img1 get $x1 $y1] break

         set x1 [expr {$x - $corners_strideXpx}]
         if {$x1 < 0} {set x1 0}
         set y1 [expr {$y - $corners_strideXpx}]
         if {$y1 < 0} {set y1 0}
         foreach {r3 g3 b3} [img1 get $x1 $y1] break

         set x1 [expr {$x + $corners_strideXpx}]
         if {$x1 > $imgWIDTHpx1} {set x1 $imgWIDTHpx1}
         set y1 [expr {$y - $corners_strideXpx}]
         if {$y1 < 0} {set y1 0}
         foreach {r4 g4 b4} [img1 get $x1 $y1] break

         #############################################################
         ## Compute the color-average to be used for the 'dab' at x,y.
         #############################################################

         set Rave [expr {int(($r0 + $r1 + $r2 + $r3 + $r4)/5.0)}]
         set Gave [expr {int(($g0 + $g1 + $g2 + $g3 + $g4)/5.0)}]
         set Bave [expr {int(($b0 + $b1 + $b2 + $b3 + $b4)/5.0)}]
         set hexcolor [format #%02X%02X%02X $Rave $Gave $Bave]

         #############################################################
         ## Set the UL (upper-left) and LR (lower-right) corners
         ## of the oval or rectangle to be drawn about the point x,y.
         #############################################################

         set ULXpx [expr {$x - $strideXpx}]
         set ULYpx [expr {$y - $strideYpx}]
         set LRXpx [expr {$x + $strideXpx}]
         set LRYpx [expr {$y + $strideYpx}]

         #############################################################
         ## Draw the oval or rectangle at x,y.
         #############################################################

         if {$OUTLINE0or1 == 0} {
            set stringOUTLINE "-outline {}"
         } else {
            set stringOUTLINE ""
         }

         if { "$VARshape" == "rect"} {
            eval .fRcanvas.can create rect \
               $ULXpx $ULYpx $LRXpx $LRYpx \
               $stringOUTLINE \
               -fill $hexcolor -tag TAGrect
         }

         if { "$VARshape" == "oval"} {
            eval .fRcanvas.can create oval \
               $ULXpx $ULYpx $LRXpx $LRYpx \
               $stringOUTLINE \
               -fill $hexcolor -tag TAGoval
         }

      }
      ## END OF loop over x

   }
   ## END OF loop over y

   ## Reset the cursor from a 'watch' cursor.
   . config -cursor {}

   ## Change the title of the window to show execution time.
   wm title . \
   "DONE pointillating.  [expr [clock milliseconds]-$t0] milliseconds elapsed"

}
## END OF proc 'pointillate_image'


##+########################################################################
## PROC 'popup_msgVarWithScroll'
##+########################################################################
## PURPOSE: Report help or error conditions to the user.
##
##       We do not use focus,grab,tkwait in this proc,
##       because we use it to show help when the GUI is idle,
##       and we may want the user to be able to keep the Help
##       window open while doing some other things with the GUI
##       such as putting a filename in the filename entry field
##       or clicking on a radiobutton.
##
##       For a similar proc with focus-grab-tkwait added,
##       see the proc 'popup_msgVarWithScroll_wait' in a
##       3DterrainGeneratorExaminer Tk script.
##
## REFERENCE: page 602 of 'Practical Programming in Tcl and Tk',
##            4th edition, by Welch, Jones, Hobbs.
##
## ARGUMENTS: A toplevel frame name (such as .fRhelp or .fRerrmsg)
##            and a variable holding text (many lines, if needed).
##
## CALLED BY: 'help' button
##+########################################################################
## To have more control over the formatting of the message (esp.
## words per line), we use this 'toplevel-text' method,
## rather than the 'tk_dialog' method -- like on page 574 of the book
## by Hattie Schroeder & Mike Doyel,'Interactive Web Applications
## with Tcl/Tk', Appendix A "ED, the Tcl Code Editor".
##+########################################################################

proc popup_msgVarWithScroll { toplevName VARtext } {

   ## global fontTEMP_varwidth #; Not needed. 'wish' makes this global.
   ## global env

   # bell
   # bell

   #################################################
   ## Set VARwidth & VARheight from $VARtext.
   #################################################
   ## To get VARheight,
   ##    split at '\n' (newlines) and count 'lines'.
   #################################################

   set VARlist [ split $VARtext "\n" ]

   ## For testing:
   #  puts "VARlist: $VARlist"

   set VARheight [ llength $VARlist ]

   ## For testing:
   #  puts "VARheight: $VARheight"


   #################################################
   ## To get VARwidth,
   ##    loop through the 'lines' getting length
   ##     of each; save max.
   #################################################

   set VARwidth 0

   #############################################
   ## LOOK AT EACH LINE IN THE LIST.
   #############################################
   foreach line $VARlist {

      #############################################
      ## Get the length of the line.
      #############################################
      set LINEwidth [ string length $line ]

      if { $LINEwidth > $VARwidth } {
         set VARwidth $LINEwidth
      }

   }
   ## END OF foreach line $VARlist

   ## For testing:
   #   puts "VARwidth: $VARwidth"


   ###############################################################
   ## NOTE: VARwidth works for a fixed-width font used for the
   ##       text widget ... BUT the programmer may need to be
   ##       careful that the contents of VARtext are all
   ##       countable characters by the 'string length' command.
   ###############################################################


   #####################################
   ## SETUP 'TOP LEVEL' HELP WINDOW.
   #####################################

   catch {destroy $toplevName}
   toplevel  $toplevName

   # wm geometry $toplevName 600x400+100+50

   wm geometry $toplevName +100+50

   wm title     $toplevName "Note"
   # wm title   $toplevName "Note to $env(USER)"

   wm iconname  $toplevName "Note"


   #####################################
   ## In the frame '$toplevName' -
   ## DEFINE THE TEXT WIDGET and
   ## its two scrollbars --- and
   ## DEFINE an OK BUTTON widget.
   #####################################

   if {$VARheight > 10} {
      text $toplevName.text \
         -wrap none \
         -font fontTEMP_varwidth \
         -width  $VARwidth \
         -height $VARheight \
         -bg "#f0f0f0" \
         -relief raised \
         -bd 2 \
         -yscrollcommand "$toplevName.scrolly set" \
         -xscrollcommand "$toplevName.scrollx set"

      scrollbar $toplevName.scrolly \
         -orient vertical \
         -command "$toplevName.text yview"

      scrollbar $toplevName.scrollx \
         -orient horizontal \
         -command "$toplevName.text xview"
   } else {
      text $toplevName.text \
         -wrap none \
         -font fontTEMP_varwidth \
         -width  $VARwidth \
         -height $VARheight \
         -bg "#f0f0f0" \
         -relief raised \
         -bd 2
   }

   button $toplevName.butt \
      -text "OK" \
      -font fontTEMP_varwidth \
      -command  "destroy $toplevName"

   ###############################################
   ## PACK *ALL* the widgets in frame '$toplevName'.
   ###############################################

   ## Pack the bottom button BEFORE the
   ## bottom x-scrollbar widget,

   pack  $toplevName.butt \
      -side bottom \
      -anchor center \
      -fill none \
      -expand 0


   if {$VARheight > 10} {
      ## Pack the scrollbars BEFORE the text widget,
      ## so that the text does not monopolize the space.

      pack $toplevName.scrolly \
         -side right \
         -anchor center \
         -fill y \
         -expand 0

      ## DO NOT USE '-expand 1' HERE on the Y-scrollbar.
      ## THAT ALLOWS Y-SCROLLBAR TO EXPAND AND PUTS
      ## BLANK SPACE BETWEEN Y-SCROLLBAR & THE TEXT AREA.

      pack $toplevName.scrollx \
         -side bottom \
         -anchor center \
         -fill x  \
         -expand 0

      ## DO NOT USE '-expand 1' HERE on the X-scrollbar.
      ## THAT KEEPS THE TEXT AREA FROM EXPANDING.

      pack $toplevName.text \
         -side top \
         -anchor center \
         -fill both \
         -expand 1
   } else {
      pack $toplevName.text \
         -side top \
         -anchor center \
         -fill both \
         -expand 1
   }


   #####################################
   ## LOAD MSG INTO TEXT WIDGET.
   #####################################

   ##  $toplevName.text delete 1.0 end

   $toplevName.text insert end $VARtext

   $toplevName.text configure -state disabled

}
## END OF PROC 'popup_msgVarWithScroll'


##+########################
## END of PROC definitions.
##+########################
## Define the HELPtext for the Help button.
##########################################

set HELPtext "\
**********  HELP for the Pointillate-an-Image utility *****************

This script serves to create 'pointillated' images from a
user-selected image file.

The image file may be a GIF (or PGM or PPM) file when using 8.5.x
(or earlier) versions of the Tk 'wish' interpreter.

The image file may be a PNG file  when using 8.6.x versions of the
'wish' interpreter.

A user-selected image file is loaded onto a Tk 'canvas' widget
with a 'create image' command.  A 'pointillation' of the image
is created on top of the image via 'create rectangle' or
'create oval' Tk commands.

The pointillation can be controlled by various 'control widgets'
on the GUI. For example:

   - radiobuttons to choose between rectangles and ovals

   - scale widget(s) to control the size of the rectangles/ovals

   - a checkbutton to ask for outlines around the 'dabs' of color.

The user has operating options such as:

   -  clearing the pointillation (rectangles/ovals) to reveal
      the original image and try again.

*****************************
CAPTURING THE GENERATED IMAGE:

   A screen/window capture utility (like 'gnome-screenshot' on Linux)
   can be used to capture the GUI image in a PNG or GIF file, say.

   If necessary, an image editor (like 'mtpaint' on Linux)
   can be used to crop the window capture image.  The image
   could also be down-sized --- say to make an icon or
   'button' image file.

*********************
POSSIBLE ENHANCEMENTS:

Eventually, we may add some options for more flexible control, such as:

Individual instances of the pointillation (rectangles or ovals
--- and, eventually, maybe polygons or thick-lines) can be
'manually' moved/deleted via mouse actions.
"

##+######################################################
##+######################################################
## Additional GUI INITIALIZATION: none needed
##+######################################################

## See the initial setting of the shape-radiobuttons variable
## and 2 scale variables above: VARshape and dabWIDTHpx and dabHEIGHTpx.
SIMILAR UTILITIES:
This is another utility that I will add to the bottom of my 'bio' page at uniquename --- in the 'CIP' (Code for Interactive image Processing) group.
I still have quite a few more utilities to add in that group. So there are more interactive-image-processing utilities to come.
IN CONCLUSION
As I have said on several other code-donation pages on this wiki ...
There's a lot to like about a utility that is 'free freedom' --- that is, no-cost and open-source so that you can modify/enhance/fix it without having to wait for someone else to do it for you (which may be never).
A BIG THANK YOU to Ousterhout for starting Tcl-Tk, and a BIG THANK YOU to the Tcl-Tk developers and maintainers who have kept the simply MAH-velous 'wish' interpreter going.
---
Some other 'fun-with-images' scripts that I have donated to this wiki:
* ImageMagnets - a Tk GUI for image processing
* tkMerge2Images - GIF/PNG/JPEG - with image-weighting & image-alignment options
* tkImageGridWarp - GIF/PNG/JPEG/other - using a barymetric technique on triangles