ImageMagnets - a Tk GUI for image processing
uniquename - 2013aug04
In a 'done-and-planned' contributions section near the bottom of my 'bio' page at uniquename, I had an 'imageMagnets' project listed --- in the 'CIP' group, where 'IP' denotes 'Interactive image Processing'.
I have addressed that item on my 'to-do' list, and the code and sample image(s) are below.
The design goals were to be able to read a GIF (or PNG) file onto a Tk canvas, and then be able to distort the image by simply clicking on points of the image.
The controls for doing this evolved during the coding and testing (along with the set of procs to be used), and I ended up with the GUI seen in the following image.

In this image, I performed one 'attract' (shrink) magnet function and 4 'repel' (bulge) magnet functions.
I clicked on the nose with the 'Power' parameter set to 0.5 (an attract/shrink setting) to shrink the face.
Then I changed the 'Power' parameter to 2.0 (a repel/bulge setting) and clicked on each bicep and each ear.
In all cases, I left the 'Radius' parameter set on 50 pixels.
I was surprised at how well this code turned out. (However, for quite a few hours, I was quite frustrated with Tcl lists, as the 'lappend' command did not seem to be working like it should. I finally worked around the problem.)
I hope you find using this utility as enjoyable as it was for me when I finally got it working.
The code
Below, I provide the Tk script code for this 'imageMagnets' utility.
I follow my usual 'canonical' structure for Tk code for this Tk script:
  0) Set general window & widget parms (win-name, win-position,
     win-color-scheme, fonts, widget-geometry-parms, win-size-control,
     text-array-for-labels-etc).

  1a) Define ALL frames (and sub-frames, if any).
  1b) Pack   ALL frames and sub-frames.

  2) Define & pack all widgets in the frames, frame by frame.
              Within each frame, define ALL the widgets.
              Then pack the widgets.

  3) Define keyboard and mouse/touchpad/touch-sensitive-screen action
     BINDINGS, if needed.

  4) Define PROCS, if needed.

  5) Additional GUI initialization (typically with one or more of
     the procs), if needed.
This Tk coding structure is discussed in more detail on the page A Canonical Structure for Tk Code --- and variations.
This structure makes it easy for me to find code sections --- while generating and testing a Tk script, and when looking for code snippets to include in other scripts (code re-use).
I call your attention to step-zero. One new thing that I have started doing recently is using a text-array for text in labels, buttons, and other widgets in the GUI. This can make it easier for people to internationalize my scripts. I will be using a text-array like this in most of my scripts in the future.
Experimenting with the GUI
As in all my scripts that use the 'pack' geometry manager (which is all of my 100-plus scripts, so far), I provide the four main pack parameters --- '-side', '-anchor', '-fill', '-expand' --- on all of the 'pack' commands for the frames and widgets.
That helps me when I am initially testing the behavior of a GUI (the various widgets within it) as I resize the main window.
I think that I have used a nice choice of the 'pack' parameters. The labels and buttons and scales stay fixed in size and relative-location as the window is re-sized --- while the 'canvas' expands/contracts to accomodate the image size.
You can experiment with the '-side', '-anchor', '-fill', and '-expand' parameters on the 'pack' commands for the various frames and widgets --- to get the widget behavior that you want.
___
In addition, you might want to change the fonts used for the various GUI widgets. For example, you could change '-weight' from 'bold' to 'normal' --- or '-slant' from 'roman' to 'italic'. Or change font families.
In fact, you may NEED to change the font families, because the families I used may not be available on your computer --- and the default font that the 'wish' interpreter chooses may not be very pleasing.
I use variables to set geometry parameters of widgets --- parameters such as border-widths and padding. And I have included the '-relief' parameter on the definitions of frames and widgets. Feel free to experiment with those 'appearance' parameters as well.
Some features in the code
That said, here's the code --- with plenty of comments to describe what most of the code-sections are doing.
You can look at the top of the PROCS section of the code to see a list of the procs used in this script, along with brief descriptions of how they are called and what they do.
The main proc is the 'apply_magnet' proc. I have provided many comments (at the top of the script and in that proc) that describe the mathematics (and geometry) that is being used to perform the attract and repel magnet functions.
It is my hope that the copious comments in the code will help Tcl-Tk coding 'newbies' get started in making GUI's like this.
Without the comments, potential young Tcler's might be tempted to return to their iPhones and iPads and iPods --- to watch videos of people jumping/falling/flipping and landing so hard that their foot is now positioned at a very strange angle relative to their leg.
Code for the Tk script 'imageMagnets.tk' :
#!/usr/bin/wish -f
##+###########################################################################
##
## SCRIPT: imageMagnets.tk
##
## PURPOSE: This script serves to edit an image file via the user clicking
## on points in the image to cause a local 'scrunching' --- or
## 'opposite of scrunching' --- of the image pixels about each
## selected 'magnet point'.
##
## That is, with each click, the image takes on an appearance as if
## pixels were attracted-to or repelled-from a 'magnet point'.
## The effect is to add the appearance of 'shrinkages' or 'bulges'
## to an image.
##
## The image input files may be GIF files, when using 8.5.x (or older)
## versions of the 'wish' interpreter --- and, additionally, the
## image input files may be PNG files when using 8.6.x versions
## of the 'wish' interpreter.
##
## GUI DESCRIPTION:
##
## This script provides a Tk GUI with the following widgets.
##
## 1) There is a FILENAME-ENTRY FIELD and 'Browse ...' BUTTON with
## which to select an image file whose image is placed on the
## CANVAS widget of this GUI.
##
## 2) There is a SCALE widget on the GUI by which the user can
## select a 'radius of influence' (R, in pixels) for the 'scrunch'
## --- for each click on the image, which selects a 'magnet point'.
##
## 3) There is another SCALE widget on the GUI by which the user can
## select a 'power' parameter, which determines attract-or-repel,
## and the strength of that attraction or repulsion.
##
## 4) There is a HELP BUTTON on the GUI which provides a popup
## window of help, as scrollable text.
##
##+######################################
## METHOD USED to hold/store the image(s):
##
## The original image, read from a GIF or PNG file, is held
## in an 'img1' Tk 'photo image' structure. That image is
## copied into a separate 'img2' Tk image structure.
##
## The new 'magnetized' color values are set in the
## 'img2' structure --- which is the image being
## shown on a Tk canvas. But since the img2 pixel colors are
## being changed in a scanning operation over a square, to avoid
## strange unwanted effects, we actually apply the magnet-effect
## to pixels on 'img1' and update pixels on 'img2'.
##
## When the scan of the circle (actually square) of influence is
## done, img2 is copied to img1 --- so that the new image is
## available for the next 'magnet click' by the user.
##
## If the magnet effects are not pleasing to the user,
## a simple 'reset' function is available. The user can
## simply click on the filename entry field to cause the img1 and
## img2 structures to be reloaded from the currently selected
## image file.
##
## (This can be useful when editing a GIF or PNG file with
## an image editor --- for example, to change brightness of
## the image --- and quickly reloading the changed image
## into the ImageMagnets GUI.)
##
## The image that the user sees (img2) is put on the canvas
## via a canvas 'image create' command.
##
## The 'magnetic' changes to img2 are applied via
## 'put <hexcolor> -to $x $y' commands on img2.
##
## If the current setting of the radius scale is 'Rpx' pixels,
## N = 2*Rpx is the width in pixels of a square whose
## center is in img2. This square contains a circle
## of pixels, of radius Rpx pixels, that is to be processed
## using a user-controlled attract-or-repel function.
##
##+####################################
## METHOD USED to perform the 'scrunch':
##
## For a given 'radius of influence' R and for a given
## 'magnet point' x0,y0, we process pixels in the
## square centered at x0,y0 --- and with side lengths 2*R.
##
## To explain the process, we take an example ---
## using a 'radial attract' function --- that varies as the
## 'square' of a 'normalized' radius.
##
## An 'attract' example:
##
## We think of a 'from' pixel in the square as being attracted
## to a 'to' pixel. That is, the color of the 'from' pixel
## will be assigned to the 'to' pixel.
##
## Let 'r_from' denote the radius (distance) of the 'from' point
## from the 'magnet point' x0,y0 --- and we let 'r_to' indicate
## the radius of the 'to' point from x0,y0.
##
## Our simple 'radial attract' function will be the x-squared
## function (over 0 to 1) applied to 'r_from' to get 'r_to'.
##
## That x-squared function sags below the straight line y=x,
## when x is between 0 and 1, thus changing an x value between
## 0 and 1 to a y value that is less than x.
##
## In particular:
##
## For a 'from' point for which r_from < R,
## we compute the radius 'r_to' of the 'to' point from
##
## r_to = (r_from / R)^2 * R
##
## where (r_from / R) represents the 'normalized' radius of the
## 'from' point. In other words, we use the square of
## the normalized radius of 'r_from' to calculate 'r_to',
## as a proportion of R.
##
## But we want to assign a pixel color to pixels on horizontal
## scan lines across the square centered at x0,y0 and with
## sides of length 2*R. So we consider each pixel on a
## scan line to be a 'to' point. To do the color assignment
## to a 'to' point, we need to reverse the above formula.
##
## That is, we need to rearrange the formula above to get
## 'r_from' from a given 'r_to'. Then we can use 'r_from'
## and the angle, ANGto, of the 'to' point as the angle of the
## 'r_from' point from the 'magnet point'.
##
## Then we use the radius 'r_from', calculated from 'r_to',
## and the angle 'ANGto' to determine the x,y pixel coordinates
## of the 'from' point --- and then use the color of the
## 'from' point to set the color of the 'to' point.
##
## We can rearrange the formula above to
##
## (r_from / R)^2 = r_to / R or r_from^2 = (r_to / R) * R^2
##
## so
##
## r_from = sqrt( r_to / R ) * R
##
## So this 'sqrt' function is the one that we use to determine
## the color of each pixel of a 'to' point on a horizontal
## scan line across the square centered at x0,y0 and with
## sides of length 2*R. And we got that square-root function
## by starting with an x-squared 'radial attraction' function.
##
## Note that the x-squared function could have been x-cubed or
## x-to-the-N for some N > 1. Then our result above would
## have been an Nth-root instead of 'sqrt'. For N=3:
##
## r_to = (r_from / R)^3 * R goes to
##
## (r_from / R)^3 = r_to / R or r_from^3 = (r_to / R) * R^3
##
## So r_from = pow( r_to / R, 1/3 ) * R
##
## on writing the formula with the Tcl 'pow' (power) function.
##
## In general, for an Nth-power 'attract' function, for N > 1,
## (such as 2, 3, 4, ...)
##
## r_from = pow( r_to / R, 1/N ) * R for N > 1.
##
## A 'repel' example:
##
## Note that for a 'radial repel', we could use the function
## square-root-of-x --- to essentially cause points (their colors)
## to move AWAY from the 'magnet point', x0,y0.
##
## (This is because the square-root-of-x is 'humped up' over the
## line y=x, over the domain of x between 0 and 1.)
##
## In other words, we are using an exponent on x of 0.5 = 1/2
## instead of exponent 2 (for an x-squared attract function).
##
## Again, we 'normalize' the radius 'r_from', by dividing by R,
## the radius of our 'circle of influence', and then apply the
## square-root-of-x function to this normalized radius to get
## a formula for 'r_to' as a proportion of R:
##
## r_to = (r_from / R)^0.5 * R
##
## Nicely, this radial function maps points on the circle of
## radius R to themselves. I.e. the color of those points will
## not be changed, but as we move inward, we will be applying
## factors less than 1 to that factor R on the right.
##
## If we carry through the math like we did above, we would
## change this formula for 'r_to' to a formula for 'r_from':
##
## (r_from / R)^0.5 = r_to / R or r_from / R = (r_to / R)^2
##
## so
##
## r_from = r_to^2 / R
##
## Let's see what happens wehn we used a cube-root 'repel' function:
##
## r_to = (r_from / R)^1/3 * R
##
## and rearranging gives
##
## (r_from / R)^1/3 = r_to / R or r_from / R = (r_to / R)^3
##
## so
##
## r_from = (r_to / R)^3 * R
##
## And in general, for an Nth-root 'repel' function, where
## N > 1, (such as 2, 3, 4, ...)
##
## r_from = pow( r_to / R, N) * R for N > 1.
##
##+########################################################################
## Let's put our 'attract' and 'repel' formulas (for 'r_from' in terms of
## 'r_to') together for comparison:
##
## For an Nth-power 'attract' function, for N > 1, (such as 2, 3, 4, ...)
##
## r_from = pow( r_to / R, 1/N ) * R for N > 1.
##
## For an Nth-root 'repel' function, where N > 1, (such as 2, 3, 4, ...)
##
## r_from = pow( r_to / R, N) * R for N > 1.
##
## Note that if we let N be either greater than 1 or less than 1 (but
## positive), we could use a single formula for attracting or repelling:
##
## ******* r_from = pow( r_to / R, N) * R **********
##
## where N is any positive real number. Examples: 2,3,4,.... and
## 1/2, 1/3, 1/4, ... And N=1 would just yield the 'identity' function,
## because
## r_from = pow( r_to / R, 1) * R = ( r_to / R ) * R = r_to
## In other words, this mapping gives 'from' points that are the
## same as the 'to' points --- so there is no color change of pixels.
##
##+###############################################
## The reason/use for the 'Power' scale on the GUI:
##
## Note that to supply the 'power' N to this formula, we will
## use a 'power' scale on the GUI that allows the user to choose
## positive real numbers --- say, between about 0.1 to 10.0.
##
## By choosing a number less than 1, the user is choosing an 'attract'
## function, and by choosing a number greater than 1, the user is
## choosing a 'repel' function.
##
##+######################################################################
## Adding some 'swirl': (for a separate imageSwirl.tk script?)
##
## Note that we could add some 'twist' to the attraction
## or repulsion by changing the angle determined from the
## 'to' point to get the angle to use for the location of the
## 'from' point, in the procedures described above.
##
## To maintain continuity of the image along the perimeter
## of the circle of radius R, we would want the amount of
## 'twist' to be zero for the 'to' and 'from' points which
## lie on the circle at radius R.
##
## So we could use (1 - x) as a factor applied to the ANGto angle,
## to get the ANGfrom angle --- where x is the 'normalized'
## radius of the 'to' point.
##
## ANGfrom = (1 - r_to/R) * ANGto
##
## Hence ANGfrom is zero when we are using a 'to' point at
## radius R to determine the 'from' point.
##
## If we want to make sure that there is no 'twist' at the
## 'magnet point' x0,y0 as well, we could use a factor
## like x * (1 - x).
##
## ANGfrom = (r_to/R) * (1 - r_to/R) * ANGto
##
## Any other function with a shape like the function x * (1 - x)
## would do to apply the twist. This is a function that is
## 0 at x=0 and x=1, and the function 'humps up' in the middle of
## the interval from 0 to 1. Note that the angular twist is then
## zero on the perimeter of the circle of radius R --- and zero at
## the center of the circle, at x0,y0.
##
## We will not complicate this 'magnet' script any further.
## We will save these 'swirl' considerations for another
## script, and another day.
##
##+################################################
## A summary of the 'radial' attract/repel method(s):
##
## Note that, to avoid discontinuities in the new image,
## a radial attract or repel function relating the radius of
## 'from' and 'to' points should leave the 'from' and 'to' points
## unchanged on the circle of radius R
## --- and, preferably, the 'from' and 'to' points should be
## unchanged at the center of the 'circle of influence',
## at the 'magnet point' x0,y0. I.e. the mapping should map
## the magnet point to itself --- and map points on the
## circle of radius R to themselves.
##
## This is true for 'radial mapping functions' like
## (r/R)^2 or its reciprocal sqrt(r/R).
##
## Note that the (r/R)^2 function is intended to act as an
## 'attract' function (a 'scrunch' function), while the
## sqrt(r/R) function would act as a 'repel' function
## (a 'negative scrunch' function).
##
## However, in applying these functions, we actually need
## to 'invert' these functions to get the color of 'to'
## pixels from 'from' pixels.
##
## The pixels in the square containing the circle of radius R
## and centered at the 'magnet point' may be 'scanned horizontally'
## from the top of the square to the bottom --- to determine
## the color of each pixel.
##
## For a 'to' pixel in the square, its radius 'r' is determined
## by sqrt( (x-x0)^2 + (y-y0)^2 ), where x0,y0
## are the pixel coordinates of the 'magnet point' and x,y are
## the pixel coordinates of the 'to' pixel being processed.
##
## If the 'to' radius is greater than R, the pixel color of that
## pixel is left unchanged. Otherwise:
##
## The 'to' radius is then used to get the 'from' radius by
## attract or repel formulas as described above. Then the
## 'from' radius and an angle are used to get the x,y coordinates
## of the 'from' point. Then the pixel color of the 'from' point
## is used as the new color at the 'to' point.
##
## USING THE GENERATED IMAGE:
## A screen/window capture utility (like 'gnome-screenshot'
## on Linux) can be used to capture the GUI image in a PNG
## or GIF file, say.
##
## If necessary, an image editor (like 'mtpaint' on Linux)
## can be used to crop the window capture image. The image
## could also be down-sized --- say to make a smaller image
## suitable for use in a web page or an email.
##
##+#######################################################################
## 'CANONICAL' STRUCTURE OF THIS CODE:
##
## 0) Set general window parms (win-name, win-position, win-color-scheme,
## fonts, widget-geom-parms, win-size-control, text-for-labels-etc).
## 1) Define ALL frames (and sub-frames). Pack them.
## 2) Define & pack all widgets in the frames.
##
## 3) Define key/mouse action BINDINGS, if needed.
## 4) Define PROCS, if needed.
## 5) Additional GUI initialization (typically with one or more of
## the procs), if needed.
##
##+#################################
## Some detail of the code structure of this particular script:
##
## 1a) Define ALL frames:
##
## Top-level :
## 'fRtop' - to contain several rows of frames, for
## - buttons (Exit, Help, labels-and-scales)
## - filename (label, entry, and Browse-button widgets)
## - help/status messages
##
## 'fRcanvas' - to contain a canvas widget,
## on which the image is placed.
##
## Sub-frames of 'fRtop':
## 'fRbuttons' - to contain several buttons - 'Exit','Help',...
## as well as a couple of scale widgets, one
## for setting a 'radius of influence' of a
## click on the image, and a second scale
## for setting a 'power' parameter.
## 'fRfile' - to contain a triplet: label-entry-button widgets
## 'fRstatus' - to allow an area for status/help messages.
##
## Sub-frames of 'fRcanvas' none, just one canvas widget.
##
## 1b) Pack ALL frames.
##
## 2) Define & pack all widgets in the frames -- basically going through
## frames & their interiors in left-to-right, or top-to-bottom order.
##
## 3) Define bindings:
## - Button1-release on the filename entry field
## - Button1-release on the canvas
##
## 4) Define procs:
## - a 'get_filename' proc to get the image filename;
## used by click on Browse button
##
## - a 'load_img' proc to get the load the image into img1,img2 structures;
## used by the binding on Button1-release on the filename entry field
##
## - 'apply_magnet' proc to apply the current attract-repel function at
## a canvas (i.e. image) point; used by binding on Button1-release on the canvas
##
## - 'popup_msgVarWithScroll'; used by click on Help button
##
## 5) Additional GUI initialization:
## - set initial values for the 2 scale widgets
##
##+#######################################################################
## DEVELOPED WITH: Tcl-Tk 8.5 on Ubuntu 9.10 (2009-october, 'Karmic Koala')
##
## $ wish
## % puts "$tcl_version $tk_version"
##
## showed
## 8.5 8.5
## but this script should work in most previous 8.x versions, and probably
## even in some 7.x versions (if font handling is made 'old-style').
##+#######################################################################
## MAINTENANCE HISTORY:
## Started by: Blaise Montandon 2013jul26
## Changed by: Blaise Montandon 2013
##+########################################################################
##+######################################################
## Set window title and position.
##+######################################################
wm title . "Image Magnets - click on image to bulge/shrink area around selected point"
wm iconname . "ImgMagnets"
wm geometry . +15+30
##+######################################################
## Set the color scheme for the window and its widgets ---
## such as listbox and entry field background color.
##+######################################################
tk_setPalette "#e0e0e0"
# set listboxBKGD "#ffffff"
set entryBKGD "#ffffff"
##+########################################################
## We use a VARIABLE-WIDTH font for text on label and
## button widgets.
##
## We use a FIXED-WIDTH font for the listbox list,
## for Help-text in a text widget, and for
## the text in entry fields, if any.
##+########################################################
font create fontTEMP_varwidth \
-family {comic sans ms} \
-size -14 \
-weight bold \
-slant roman
font create fontTEMP_SMALL_varwidth \
-family {comic sans ms} \
-size -12 \
-weight bold \
-slant roman
## Some other possible (similar) variable width fonts:
## Arial
## Bitstream Vera Sans
## DejaVu Sans
## Droid Sans
## FreeSans
## Liberation Sans
## Nimbus Sans L
## Trebuchet MS
## Verdana
font create fontTEMP_fixedwidth \
-family {liberation mono} \
-size -14 \
-weight bold \
-slant roman
font create fontTEMP_SMALL_fixedwidth \
-family {liberation mono} \
-size -12 \
-weight bold \
-slant roman
## Some other possible fixed width fonts (esp. on Linux):
## Andale Mono
## Bitstream Vera Sans Mono
## Courier 10 Pitch
## DejaVu Sans Mono
## Droid Sans Mono
## FreeMono
## Nimbus Mono L
## TlwgMono
##+###########################################################
## SET GEOM VARS FOR THE VARIOUS WIDGET DEFINITIONS.
## (e.g. width and height of canvas, and padding for Buttons)
##+###########################################################
set initCanWidthPx 300
set initCanHeightPx 300
set minCanWidthPx 24
set minCanHeightPx 24
# set BDwidthPx_canvas 2
set BDwidthPx_canvas 0
## BUTTON widget geom settings:
set PADXpx_button 0
set PADYpx_button 0
set BDwidthPx_button 2
## LABEL widget geom settings:
set PADXpx_label 0
set PADYpx_label 0
set BDwidthPx_label 2
## SCALE widget geom parameters:
set BDwidthPx_scale 2
set initScaleLengthPx 200
set scaleWidthPx 10
## LISTBOX widget geom settings:
set BDwidthPx_listbox 2
set initListboxWidthChars 30
set initListboxHeightChars 8
## ENTRY widget geom settings:
set BDwidthPx_entry 2
set initEntryWidthChars 20
##+######################################################################
## Set a MINSIZE of the window (roughly).
##
## For WIDTH, allow for the minwidth of the '.fRtop' frame
## --- that is, for the '.fRbuttons' and '.fRfile' subframes:
## in the 'fRbuttons' frame:
## at least 2 buttons --- Exit,Help --- and couple of
## pairs of label-and-scale widgets.
##
## For HEIGHT, allow for the stack of frames:
## 2 char high for the widgets in the '.fRbuttons' subframe,
## 1 char high for the widgets in the '.fRfile' subframe,
## 1 char high for the label widget in the '.fRstatus' subframe,
## at least 24 pixels high for the image in the canvas.
##+#####################################################################
set minWinWidthPx [font measure fontTEMP_varwidth \
"Exit Help Radius of Influence . . . . . Strength factor . . . . . ."]
## Then add some pixels to account for right-left-size of
## window-manager decoration (~8 pixels) and some pixels for
## frame/widget borders (~6 widgets x 4 pixels/widget = 24 pixels).
set minWinWidthPx [expr {32 + $minWinWidthPx}]
## For HEIGHT:
## Get a character height for a font in use.
set charHeightPx [font metrics fontTEMP_varwidth -linespace]
## Allow for the subframes of the right frame:
## 2 char high for the widgets in the '.fRbuttons' subframe,
## 1 char high for the widgets in the '.fRfile' subframe,
## 1 char high for the label widget in the '.fRstatus' subframe,
## at least 24 pixels high for the image in the canvas.
##
## AND add about 20 pixels for top-bottom window decoration --
## and some pixels for top-and-bottom of frame/widget borders
## (~4 widgets x 4 pixels/widget = 16 pixels).
set minWinHeightPx [expr {36 + 24 + ( 4 * $charHeightPx )}]
## FOR TESTING:
# puts "minWinWidthPx = $minWinWidthPx"
# puts "minWinHeightPx = $minWinHeightPx"
wm minsize . $minWinWidthPx $minWinHeightPx
## We allow the window to be resizable and we pack the canvas with
## '-fill both -expand 1' so that the canvas can be enlarged by
## enlarging the window.
## If you want to make the window un-resizable,
## you can use the following statement.
# wm resizable . 0 0
##+##############################################################
## Set a TEXT-ARRAY to hold text for buttons & labels on the GUI.
## NOTE: This can aid INTERNATIONALIZATION. This array can
## be set according to a nation/region parameter.
##+##############################################################
## if { "$VARlocale" == "en"}
## For '.fRbuttons' frame:
set aRtext(buttonEXIT) "Exit"
set aRtext(buttonHELP) "Help"
set aRtext(labelRADIUS) " 'Radius of influence' of a
click on the image (in pixels):"
set aRtext(labelSTRENGTH) " 'Power' of the magnet
(positive real number):"
set aRtext(labelFILENAME) "ImgFilename (GIF/PNG):"
set aRtext(buttonBROWSE) "Browse ..."
set aRtext(labelINFO) "\
Click on the filename entry field to (re)load the canvas area. This can be used
as a 'Reset' or 'Undo' function. Note that values of 'Power' less than 1
make the magnet 'attract' (shrinkage), and greater than 1 'repel' (bulges)."
## END OF if { "$VARlocale" == "en"}
##+################################################################
## DEFINE *ALL* THE FRAMES:
##
## Top-level : '.fRtop' , '.fRcanvas'
##
## Sub-frames: '.fRtop.fRbuttons', '.fRtop.fRfile', '.fRtop.fRstatus'
##+################################################################
## FOR TESTING of frame expansion:
# set BDwidth_frame 2
# set RELIEF_frame raised
set BDwidth_frame 0
set RELIEF_frame flat
frame .fRtop -relief $RELIEF_frame -borderwidth $BDwidth_frame
frame .fRcanvas -relief raised -borderwidth 2
frame .fRtop.fRbuttons -relief $RELIEF_frame -bd $BDwidth_frame
frame .fRtop.fRfile -relief $RELIEF_frame -bd $BDwidth_frame
frame .fRtop.fRstatus -relief $RELIEF_frame -bd $BDwidth_frame
##+##############################
## PACK the FRAMES.
##+##############################
pack .fRtop \
-side top \
-anchor nw \
-fill x \
-expand 0
pack .fRcanvas \
-side left \
-anchor nw \
-fill both \
-expand 1
## Pack the sub-frames.
pack .fRtop.fRbuttons \
-side top \
-anchor nw \
-fill x \
-expand 0
pack .fRtop.fRfile \
-side top \
-anchor nw \
-fill x \
-expand 0
pack .fRtop.fRstatus \
-side top \
-anchor center \
-fill x \
-expand 1
##+##########################################################
## The frames are defined. Start adding widgets to them.
##+##########################################################
##+##########################################################
## In FRAME '.fRtop.fRbuttons' -
## DEFINE-and-PACK 'BUTTON' WIDGETS
## --- Exit, Help, ... --- and a label-and-scale widget pair
## (for changing the 'radius of influence' of the
## magnet action on the image in the canvas area).
##+##########################################################
button .fRtop.fRbuttons.buttEXIT \
-text "$aRtext(buttonEXIT)" \
-font fontTEMP_varwidth \
-padx $PADXpx_button \
-pady $PADYpx_button \
-relief raised \
-bd $BDwidthPx_button \
-command {exit}
button .fRtop.fRbuttons.buttHELP \
-text "$aRtext(buttonHELP)" \
-font fontTEMP_varwidth \
-padx $PADXpx_button \
-pady $PADYpx_button \
-relief raised \
-bd $BDwidthPx_button \
-command {popup_msgVarWithScroll .fRhelp "$HELPtext"}
label .fRtop.fRbuttons.labelRADIUS \
-text "$aRtext(labelRADIUS)" \
-font fontTEMP_SMALL_varwidth \
-justify left \
-anchor w \
-relief flat \
-padx $PADXpx_label \
-pady $PADYpx_label \
-bd $BDwidthPx_label
## Set this widget var in the GUI initialization section
## at the bottom of this script.
# set Rpx 50
scale .fRtop.fRbuttons.scaleRADIUS \
-from 4 -to 800 \
-resolution 1 \
-font fontTEMP_SMALL_varwidth \
-variable Rpx \
-showvalue true \
-orient horizontal \
-bd $BDwidthPx_scale \
-length $initScaleLengthPx \
-width $scaleWidthPx
label .fRtop.fRbuttons.labelSTRENGTH \
-text "$aRtext(labelSTRENGTH)" \
-font fontTEMP_SMALL_varwidth \
-justify left \
-anchor w \
-relief flat \
-padx $PADXpx_label \
-pady $PADYpx_label \
-bd $BDwidthPx_label
## Set this widget var in the GUI initialization section
## at the bottom of this script.
# set PowerExp 0.5
scale .fRtop.fRbuttons.scaleSTRENGTH \
-from 0.1 -to 10.0 \
-resolution 0.1 \
-font fontTEMP_SMALL_varwidth \
-variable PowerExp \
-showvalue true \
-orient horizontal \
-bd $BDwidthPx_scale \
-length $initScaleLengthPx \
-width $scaleWidthPx
## Pack the '.fRtop.fRbutton' frame's widgets.
pack .fRtop.fRbuttons.buttEXIT \
.fRtop.fRbuttons.buttHELP \
.fRtop.fRbuttons.labelRADIUS \
.fRtop.fRbuttons.scaleRADIUS \
.fRtop.fRbuttons.labelSTRENGTH \
.fRtop.fRbuttons.scaleSTRENGTH \
-side left \
-anchor w \
-fill none \
-expand 0
##+###############################
## In FRAME '.fRtop.fRfile' -
## DEFINE-and-PACK 3 widgets -
## LABEL, ENTRY, BUTTON:
##+###############################
label .fRtop.fRfile.labelFILE \
-text "$aRtext(labelFILENAME)" \
-font fontTEMP_varwidth \
-justify left \
-anchor w \
-relief flat \
-bd 0
set ENTRYfilename ""
entry .fRtop.fRfile.entFILENAME \
-textvariable ENTRYfilename \
-bg $entryBKGD \
-font fontTEMP_fixedwidth \
-width $initEntryWidthChars \
-relief sunken \
-bd $BDwidthPx_entry
button .fRtop.fRfile.buttBROWSE \
-text "$aRtext(buttonBROWSE)" \
-font fontTEMP_varwidth \
-padx $PADXpx_button \
-pady $PADYpx_button \
-relief raised \
-bd $BDwidthPx_button \
-command {get_img_filename}
## Pack the '.fRtop.fRfile' widgets.
pack .fRtop.fRfile.labelFILE \
-side left \
-anchor w \
-fill none \
-expand 0
pack .fRtop.fRfile.entFILENAME \
-side left \
-anchor w \
-fill x \
-expand 1
pack .fRtop.fRfile.buttBROWSE \
-side left \
-anchor w \
-fill none \
-expand 0
##+#########################################
## In FRAME '.fRtop.fRstatus' -
## DEFINE-and-PACK a LABEL WIDGET
## (for various info).
##+#########################################
label .fRtop.fRstatus.labelINFO \
-text "$aRtext(labelINFO)" \
-font fontTEMP_varwidth \
-justify center \
-anchor center \
-bg "#aaaaaa" \
-relief raised \
-bd 2
## Pack the widgets in frame '.fRtop.fRstatus'.
pack .fRtop.fRstatus.labelINFO \
-side top \
-anchor center \
-fill x \
-expand 0
##+########################################################
## In FRAME '.fRcanvas' -
## DEFINE-and-PACK a CANVAS WIDGET --- with SCROLLBARs.
##
## We highlightthickness & borderwidth of the canvas to
## zero, as suggested on page 558, Chapter 37, 'The Canvas
## Widget', in the 4th edition of the book 'Practical
## Programming in Tcl and Tk'.
##+#######################################################
canvas .fRcanvas.can \
-width $initCanWidthPx \
-height $initCanHeightPx \
-relief flat \
-highlightthickness 0 \
-borderwidth 0 \
-yscrollcommand ".fRcanvas.scrolly set" \
-xscrollcommand ".fRcanvas.scrollx set"
scrollbar .fRcanvas.scrolly \
-orient vertical \
-command ".fRcanvas.can yview"
scrollbar .fRcanvas.scrollx \
-orient horizontal \
-command ".fRcanvas.can xview"
## PACK the widgets in frame '.fRcanvas'.
## NOTE:
## GOOD TO PACK THE SCROLLBARS BEFORE THE CANVAS WIDGET.
## THE CANVAS WIDGET MAY TRY TO TAKE ALL THE FRAME SPACE.
pack .fRcanvas.scrolly \
-side left \
-anchor w \
-fill y \
-expand 0
## DO NOT USE '-expand 1' FOR Y-SCROLLBAR. IT ALLOWS Y-SCROLLBAR
## TO X-EXPAND. IT PUTS BLANK SPACE BETWEEN Y-SCROLLBAR & CANVAS.
pack .fRcanvas.scrollx \
-side bottom \
-anchor s \
-fill x \
-expand 0
## DO NOT USE '-expand 1' FOR X-SCROLLBAR. IT ALLOWS X-SCROLLBAR
## TO Y-EXPAND. IT KEEPS THE CANVAS FROM Y-EXPANDING.
pack .fRcanvas.can \
-side top \
-anchor nw \
-fill both \
-expand 1
##+##################################################
## END OF DEFINITION of the GUI widgets.
##+##################################################
## Start of BINDINGS, PROCS, Added-GUI-INIT sections.
##+##################################################
##+#######################################################################
##+#######################################################################
## BINDINGS SECTION:
##
## - For MB1-release in the filename entry field,
## use the filename to load the img1 and img2 image structures
## and 'connect' img2 to the canvas.
##
## - For a click on (img2 in) the canvas widget,
## call on a proc to use the current attract/repel 'power' parameter
## to perform the magnet-effect on pixels in img2.
##+#######################################################################
bind .fRtop.fRfile.entFILENAME <ButtonRelease-1> {load_file_to_imgStructure}
bind .fRcanvas.can <ButtonRelease-1> { apply_magnet %x %y }
##+#########################################################################
##+#########################################################################
## DEFINE PROCS SECTION:
##
## - 'get_img_filename' - to get the filename of an image (GIF/PNG) file
## and put the filename in var ENTRYfilename.
## (triggered by a click on the 'Browse...' button)
##
## - 'get_chars_before_last' - to return all of the characters in a
## string "strng" that are BEFORE the
## last occurence of the characater "char".
## (called by the 'get_img_filename' proc)
##
## - 'load_file_to_imgStructure' -
## For a given filename in var ENTRYfilename,
## load its image into image structures 'img1' and
## 'img2' --- and place 'img2' on the canvas.
##
## AND HERE'S THE BEEF:
##
## - 'apply_magnet' - to use the current attract/repel proc to
## perform the magnet-effect on pixels in img2.
##
##+#########################################################################
##+#########################################################################
## proc 'get_img_filename' -
##
## PURPOSE: To get the name of an image file (GIF/PNG) and put the
## filename into global var 'ENTRYfilename'.
##
## CALLED BY: the '-command' option of the 'Browse ...' button.
##+#########################################################################
# set curDIR "$env(HOME)"
set curDIR [pwd]
proc get_img_filename {} {
global ENTRYfilename env curDIR img1
## Load data from an OBJ file
set fName [tk_getOpenFile -parent . -title "Select GIF/PNG file to load" \
-initialdir "$curDIR" ]
## FOR TESTING:
# puts "fName : $fName"
## Check that the filename exists.
## If so, load vars ENTRYfilename and curDIR.
if {[file exists $fName]} {
set ENTRYfilename "$fName"
set curDIR [ get_chars_before_last / in "$ENTRYfilename" ]
## Create both the img1 and img2 structures from the image file.
## We experiment with making this happen as soon as the file is selected.
if {1} {
load_file_to_imgStructure
}
}
}
## END OF proc 'get_img_filename'
##+#######################################################################
## proc 'get_chars_before_last'
##
## INPUT: A character and a string.
## Note: The "in" parameter is there only for clarity.
##
## PURPOSE: Returns all of the characters in the string "strng" that
## are BEFORE the last occurence of the characater "char".
##
## EXAMPLE CALL: To extract the directory from a fully qualified file name:
##
## set directory [ get_chars_before_last "/" in "/home/abc01/junkfile" ]
##
## $directory will now be the string "/home/abc01"
##
## CALLED BY: the 'get_img_filename' proc
##+#######################################################################
proc get_chars_before_last { char in strng } {
set lastIDX [ expr [string last $char $strng ] - 1 ]
set output [ string range $strng 0 $lastIDX ]
## FOR TESTING:
# puts "From 'get_chars_before_last' proc:"
# puts "STRING: $strng"
# puts "CHAR: $char"
# puts "RANGE up to *LAST* CHAR - start: 0 lastIDX: $lastIDX"
return $output
}
## END OF proc 'get_chars_before_last'
##+#########################################################################
## proc 'load_file_to_imgStructure'
##
## PURPOSE: For a given filename in var ENTRYfilename,
## load its image into image structures 'img1' and 'img2'
## and place 'img2' on the canvas.
##
## CALLED BY: button1-release binding on the filename entry field
##+#########################################################################
proc load_file_to_imgStructure {} {
global ENTRYfilename img1 img2
## Clear the canvas.
.fRcanvas.can delete all
################################################################
## Create both the img1 and img2 structures from the image file.
################################################################
set img1 [image create photo -file "$ENTRYfilename"]
## set img2 [image create photo -file "$ENTRYfilename"]
## It probably would be more efficient to copy img1 to img2.
## So we do that:
set img2 [image create photo]
eval $img2 copy $img1 -from 0 0 -to 0 0
## FOR TESTING:
# puts "load_file_to_imgStructure - img1: $img1 img2: $img2"
## Place img2 on the canvas.
.fRcanvas.can create image 0 0 -anchor nw -image $img2
## Force the canvas to resize to contain image (up to screen limits).
## (A simple 'update' does not work.)
set PXwidth2 [image width $img2]
set PXheight2 [image height $img2]
.fRcanvas.can configure -width $PXwidth2 -height $PXheight2
}
## END OF proc 'load_file_to_imgStructure'
##+######################################################################
## proc 'apply_magnet'
##
## PURPOSE: This attact proc takes the 'magnet point' coordinates
## x0,y0 as input and then updates 'img2' according to
## the current value of R, the 'radius of influence', and
## the current value of 'PowerExp', which determines whether
## to attract-or-repel and the strength of the attraction/repulsion.
##
## METHOD:
##
## The attract/repel procedure does the image-update at pixels
## within a square that is 2*R per side, with calls like:
## img2 put $hexcolor -to $x $y
## where $x,$y is a pixel location in the (2*R)-width square
## centered at 'magnet point' x0,y0.
##
## In a double loop over y and x in the 2*R square centered at x0,y0,
## we want to assign a pixel color to pixels as we 'scan' horizontally
## across the square. So we consider each pixel on a horizontal
## scan line to be a 'to' point. And we need to determine
## a 'from' point in the image, from which to get the color
## for the 'to' point.
##
## Let us set up an example 'attraction' function --- which
## maps a 'from' point to a 'to' point.
##
## We let 'r' represent a radius --- the 'normalized' radius
## of a point x,y relative to x0,y0. I.e. if x,y is within R
## of x0,y0, then r = hypot(x-x0,y-y0) / R.
##
## So r varies from 0 to 1 for x,y in the circle of radius R
## and centered at x0,y0.
##
## For our example 'attraction' function, we could use r-squared as
## a factor to apply to R --- to shrink 'r_from' to 'r_to'.
##
## The process of getting the color for each 'to' point on the
## scanline in a 'squared' fashion comes from the fact that
## the radius 'r_to' of the 'to' point comes from the radius
## 'r_from' of the 'from' point by
##
## r_to = (r_from / R)^2 * R
##
## where (r_from / R) represents the 'normalized' radius of the
## 'from' point. In other words, we use the square of
## the normalized radius of 'r_from' to calculate 'r_to',
## as a proportion of R.
##
## Note that for points with r_from = R, then r_to = R. In other
## words, on the outer periphery of the 'circle of influence',
## the points are not relocated inward.
##
## But as we look at 'from' points closer and closer to x0,y0,
## they are mapped to 'to' points that are even closer to x0,y0.
##
## To do the 'color get' for the 'to' point, we need to
## reverse the above formula.
##
## That is, we need to rearrange the formula above to get
## 'r_from' for a given 'r_to'. Then we can use 'r_from'
## and the angle, ANGto, of the 'to' point as the angle of the
## 'r_from' point from the 'magnet point'.
##
## We use the radius 'r_from', calculated from 'r_to', and
## the angle 'ANGto' to determine the x,y pixel coordinates
## of the 'from' point. Then we query that 'from' point
## for its color --- and use the color of the 'from' point
## to set the color of the 'to' point.
##
## As discussed in more generality in the 'METHOD' comments
## at the top of this imageMagnets script, we can rearrange
## the formula above to
##
## r_from = pow( r_to / R, 0.5) * R
##
## That covers the case where the 'magnet' is a 'square' function
## --- i.e. where the parameter 'PowerExp' is 0.5.
##
## Note that we needed to actually use a 'square-root' function
## for the 'squared' attraction function, to implement the
## process of transferring color values to pixels.
##
## For more generality in choosing attract/repel functions
## for our 'magnet', we give the user some control over the
## type and strength of the magnetism by providing the
## parameter 'PowerExp':
##
## r_from = pow( r_to / R, PowerExp) * R
##
## For more details on how we arrived at the parameter
## 'PowerExp', see the 'METHOD' comments at the top
## of this imageMagnets script
##
## CALLED BY: a button1-release binding on the canvas (img2)
##+######################################################################
proc apply_magnet {x0Px y0Px} {
global Rpx PowerExp img2 img1
##########################################################
## The magnet function executes so fast that the following
## performance-related statements were not needed.
##########################################################
# wm title . "*BUSY* ...... Calculating using proc: 'apply_magnet'"
## Set the current time, for determining execution
## time for building the photo image, below.
# set t0 [clock seconds]
## Change the cursor to a 'watch' cursor.
# . config -cursor watch
## Make the cursor visible.
# update
############################################################
## Get the current width & height of the canvas (in pixels).
############################################################
# set imgWidthPx [winfo width .fRcanvas.can]
# set imgHeightPx [winfo height .fRcanvas.can]
## OR use width & height of the img2 structure.
set imgWidthPx [image width $img2]
set imgHeightPx [image height $img2]
################################################################
## If the magnet point x0Px,y0Px is closer than Rpx to the edges
## of the canvas, we exit without doing anything.
## (This keeps the logic in this proc relatively simple.
## We do not have to handle cases when the 2*R square goes
## off the canvas/image.
## The user can set a smaller Rpx to perform magnetic
## effects near the edge of the canvas.)
## (We could put a warning msg in a label on the GUI,
## instead of simply doing 'return'. Later?)
################################################################
if {$x0Px < $Rpx} {return}
if {$y0Px < $Rpx} {return}
set delta [expr {$imgWidthPx - $x0Px}]
if {$delta < $Rpx} {return}
set delta [expr {$imgHeightPx - $y0Px}]
if {$delta < $Rpx} {return}
## FOR TESTING: (Put a text msg on the canvas.)
# .fRcanvas.can create text 10 10 -anchor nw \
# -text "starting processing." -tag canmsg
#################################################################
## Perform the magnet function based at x0Px,y0Px with
## radius Rpx pixels.
################################################################
## HERE IS WHERE WE DRAW THE NEW IMAGE in a 'sub-square' of img2:
##
## The square has
## left-side at x0Px - Rpx
## right-side at x0Px + Rpx
## top-side at y0Px - Rpx
## bottom-side at y0Px + Rpx
##
## In a double-loop over the square's height and width (2*Rpx pixels
## in the x and y directions),
## draw each row of the square, using an attact/repel function
## determined by the 'PowerExp' parameter, to determine the color
## to set each pixel in a given row of pixels.
################################################################
## We draw the square --- proceeding by horizontal lines.
##
## For each y (going from the top of the square area to the bottom),
## we set the colors in the horizontal lines.
##
## In more detail:
## We increment y from the top of the square, yPx = y0Px - Rpx, to the
## bottom of the square, yPx = y0Px + Rpx, and
## increment x from the left of the square, xPx = x0Px - Rpx
## to the right of the image xPx = x0Px + Rpx.
##
## We build each horizontal line pixel-by-pixel.
## we set a pixel color at location $xPx,$yPx --- via the
## following procedure:
##
## For the pixel (point) at ($xPx,$yPx) = ($i,$j), we calculate
## deltax = $xPx - $x0Px
## deltay = $yPx - $y0Px
##
## Then we calculate its radius, 'r_to':
## r_to = sqrt(($deltax * $deltax) + ($deltay * $deltay)).
##
## From 'r_to', we calculate 'r_from' via the formula
## r_from = pow( r_to / R, PowerExp) * R
##
## Then we get the x,y coordinates (in pixels) of the 'from' point:
## x_fromPx = round ( $x0Px + $r_from * ($deltax / $r_to) )
## y_fromPx = round ( $y0Px + $r_from * ($deltay / $r_to) )
##
## avoiding r_to = 0, i.e. skip x,y = x0Px,y0Px --- to avoid
## division by zero.
## Thus we get 'x_from' and 'y_from' in integer form.
##
## We get the pixel color (RGB values) of the 'from' point via
## foreach {r g b} [$img1 get $x_fromPx $y_fromPx] break
##
## We convert this to a hex-code via
## set hexcolor [format #%02X%02X%02X $r $g $b]
##
## we 'put' the hexcolor on the img2 image structure, with
## img2 put $hexcolor -to $xPx $yPx
####################################################################
set xleftPx [expr {$x0Px - $Rpx}]
set xrightPx [expr {$x0Px + $Rpx}]
set ytopPx [expr {$y0Px - $Rpx}]
set ybotPx [expr {$y0Px + $Rpx}]
set lenPx [expr {2 * $Rpx}]
for {set yPx $ytopPx} {$yPx < $ybotPx} {incr yPx} {
## FOR TESTING: (Put a text msg on the canvas.)
# .fRcanvas.can delete tag canmsg
# .fRcanvas.can create text 10 10 -anchor nw \
# -font fontTEMP_fixedwidth \
# -text "Processing row y: [expr $y + 1] of $height rows" -tag canmsg
# update ;# to make the msg visible
## We iterate over the pixels of the next horizontal scan-line.
for {set xPx $xleftPx} {$xPx < $xrightPx} {incr xPx} {
## Get the radius of the current 'to' point --- and the x,y delta values.
set deltax [expr {$xPx - $x0Px}]
set deltay [expr {$yPx - $y0Px}]
set r_to [expr {sqrt(double(($deltax * $deltax) + ($deltay * $deltay)))}]
#######################################################
## If 'r_to' is greater than R, plot the img1-color that
## is at xPx,yPx to the 'to' point of img2 and 'continue'
## --- i.e. go to the next increment of the x-loop.
#######################################################
if {$r_to >= $Rpx} {
foreach {r g b} [$img1 get $xPx $yPx] break
set hexcolor [format #%02X%02X%02X $r $g $b]
eval $img2 put $hexcolor -to $xPx $yPx
continue
}
## END OF if {$r_to >= $Rpx}
#######################################################
## At this point, 'r_to' is less than 'Rpx'.
## Calculate the xy coords of the 'from' point, for a
## 'squared' magnetic-attraction.
#######################################################
if {$r_to == 0.0} {
set x_fromPx $x0Px
set y_fromPx $y0Px
} else {
#############################################################
## At this point, we can use our 'pow' expression to implement
## an attract or repel magnet effect. The formula is
## ***** r_from = pow( r_to / R, PowerExp) * R ********
#############################################################
set r_from [expr {pow($r_to / $Rpx, $PowerExp) * $Rpx}]
set x_fromPx [expr {round( $x0Px + ($r_from * ($deltax / $r_to)) )}]
set y_fromPx [expr {round( $y0Px + ($r_from * ($deltay / $r_to)) )}]
}
###############################################################
## Get the hexcolor of the 'from' pixel from 'img1'.
###############################################################
foreach {r g b} [$img1 get $x_fromPx $y_fromPx] break
set hexcolor [format #%02X%02X%02X $r $g $b]
####################################################################
## Plot the hexcolor of the 'from' pixel at the 'to' point of 'img2'.
####################################################################
eval $img2 put $hexcolor -to $xPx $yPx
## FOR TESTING:
# set TESTxPx [expr {$x0Px + 2}]
# if {$xPx == $TESTxPx} {
# puts "apply_magnet > xPx: $xPx yPx: $yPx hexcolor: $hexcolor"
# }
}
## END OF xPx loop
## FOR TESTING: (show the progress after drawing each
## horizontal line for a yPx value)
# update
}
## END OF yPx loop
####################################################################
## Copy the changed img2 to img1 --- for the next magnet action
## to apply to the changed image, rather than the original image.
####################################################################
eval $img1 copy $img2 -from 0 0 -to 0 0
##########################################################
## The magnet function executes so fast that the following
## performance-related statements were not needed.
##########################################################
## Reset the cursor from a 'watch' cursor.
# . config -cursor {}
## Change the title of the window to show execution time.
# wm title . \
# "DONE. [expr [clock seconds]-$t0] seconds elapsed using: $MAGNETtype"
}
## END OF proc 'apply_magnet'
##+########################################################################
## PROC 'popup_msgVarWithScroll'
##+########################################################################
## PURPOSE: Report help or error conditions to the user.
##
## We do not use focus,grab,tkwait in this proc,
## because we use it to show help when the GUI is idle,
## and we may want the user to be able to keep the Help
## window open while doing some other things with the GUI
## such as putting a filename in the filename entry field
## or clicking on a radiobutton.
##
## For a similar proc with focus-grab-tkwait added,
## see the proc 'popup_msgVarWithScroll_wait' in a
## 3DterrainGeneratorExaminer Tk script.
##
## REFERENCE: page 602 of 'Practical Programming in Tcl and Tk',
## 4th edition, by Welch, Jones, Hobbs.
##
## ARGUMENTS: A toplevel frame name (such as .fRhelp or .fRerrmsg)
## and a variable holding text (many lines, if needed).
##
## CALLED BY: 'help' button
##+########################################################################
## To have more control over the formatting of the message (esp.
## words per line), we use this 'toplevel-text' method,
## rather than the 'tk_dialog' method -- like on page 574 of the book
## by Hattie Schroeder & Mike Doyel,'Interactive Web Applications
## with Tcl/Tk', Appendix A "ED, the Tcl Code Editor".
##+########################################################################
proc popup_msgVarWithScroll { toplevName VARtext } {
## global fontTEMP_varwidth #; Not needed. 'wish' makes this global.
## global env
# bell
# bell
#################################################
## Set VARwidth & VARheight from $VARtext.
#################################################
## To get VARheight,
## split at '\n' (newlines) and count 'lines'.
#################################################
set VARlist [ split $VARtext "\n" ]
## For testing:
# puts "VARlist: $VARlist"
set VARheight [ llength $VARlist ]
## For testing:
# puts "VARheight: $VARheight"
#################################################
## To get VARwidth,
## loop through the 'lines' getting length
## of each; save max.
#################################################
set VARwidth 0
#############################################
## LOOK AT EACH LINE IN THE LIST.
#############################################
foreach line $VARlist {
#############################################
## Get the length of the line.
#############################################
set LINEwidth [ string length $line ]
if { $LINEwidth > $VARwidth } {
set VARwidth $LINEwidth
}
}
## END OF foreach line $VARlist
## For testing:
# puts "VARwidth: $VARwidth"
###############################################################
## NOTE: VARwidth works for a fixed-width font used for the
## text widget ... BUT the programmer may need to be
## careful that the contents of VARtext are all
## countable characters by the 'string length' command.
###############################################################
#####################################
## SETUP 'TOP LEVEL' HELP WINDOW.
#####################################
catch {destroy $toplevName}
toplevel $toplevName
# wm geometry $toplevName 600x400+100+50
wm geometry $toplevName +100+50
wm title $toplevName "Note"
# wm title $toplevName "Note to $env(USER)"
wm iconname $toplevName "Note"
#####################################
## In the frame '$toplevName' -
## DEFINE THE TEXT WIDGET and
## its two scrollbars --- and
## DEFINE an OK BUTTON widget.
#####################################
text $toplevName.text \
-wrap none \
-font fontTEMP_varwidth \
-width $VARwidth \
-height $VARheight \
-bg "#f0f0f0" \
-relief raised \
-bd 2 \
-yscrollcommand "$toplevName.scrolly set" \
-xscrollcommand "$toplevName.scrollx set"
scrollbar $toplevName.scrolly \
-orient vertical \
-command "$toplevName.text yview"
scrollbar $toplevName.scrollx \
-orient horizontal \
-command "$toplevName.text xview"
button $toplevName.butt \
-text "OK" \
-font fontTEMP_varwidth \
-command "destroy $toplevName"
###############################################
## PACK *ALL* the widgets in frame '$toplevName'.
###############################################
## Pack the bottom button BEFORE the
## bottom x-scrollbar widget,
pack $toplevName.butt \
-side bottom \
-anchor center \
-fill none \
-expand 0
## Pack the scrollbars BEFORE the text widget,
## so that the text does not monopolize the space.
pack $toplevName.scrolly \
-side right \
-anchor center \
-fill y \
-expand 0
## DO NOT USE '-expand 1' HERE on the Y-scrollbar.
## THAT ALLOWS Y-SCROLLBAR TO EXPAND AND PUTS
## BLANK SPACE BETWEEN Y-SCROLLBAR & THE TEXT AREA.
pack $toplevName.scrollx \
-side bottom \
-anchor center \
-fill x \
-expand 0
## DO NOT USE '-expand 1' HERE on the X-scrollbar.
## THAT KEEPS THE TEXT AREA FROM EXPANDING.
pack $toplevName.text \
-side top \
-anchor center \
-fill both \
-expand 1
#####################################
## LOAD MSG INTO TEXT WIDGET.
#####################################
## $toplevName.text delete 1.0 end
$toplevName.text insert end $VARtext
$toplevName.text configure -state disabled
}
## END OF PROC 'popup_msgVarWithScroll'
##+########################
## END of PROC definitions.
##+########################
## Set HELPtext var.
##+########################
set HELPtext "\
\ \ \ \ \ ** HELP for this 'ImageMagnets' Image Processing Utility **
This utility serves to edit the image from an image file (GIF or PNG) via
the user clicking on points in the image to cause a local 'scrunching' ---
or the 'opposite of scrunching' --- of the image pixels about each
selected 'magnet point'.
That is, with each click, the image takes on an appearance as if
pixels were attracted-to or repelled-from a 'magnet point'.
The effect is to add the appearance of 'shrinkages' or 'bulges'
to an image.
The image input files may be GIF files, when using 8.5.x (or older)
versions of the Tcl-Tk 'wish' interpreter --- and, additionally, the
image input files may be PNG files when using 8.6.x versions
of the 'wish' interpreter.
The mathematical method used to perform the 'magnet' function is
explained in extensive detail in comments at the top of this script.
We will not go into the math here. Rather we explain some operating
features of the GUI.
MODE OF OPERATION:
The typical sequence of operations is as follows.
1) Use the 'Browse...' button on the GUI to navigate to an image
file and select it --- via a Tk 'OpenFile' GUI.
When you OK the selection, the 'OpenFile' GUI will close and
you will find that the image is loaded to the 'canvas' of
this 'imageMagnets' GUI.
2) Start clicking on the image --- to 'scrunch' parts of the image.
2a) You can control the type-and-strength of the 'magnet' by
using the 'Power' slider bar.
Use 'Power' values less than 1 (for example, 0.5) to make the
magnet perform in an 'attract' (shrinkage) mode.
Use 'Power' values greater than 1 (for example, 2.0) to make the
magnet perform in a 'repel' (bulge) mode.
2b) You can control the 'radius of influence' by using the 'Radius'
slider bar. This sets the radius of influence of the 'magnet'
in units of pixels.
3) If you are dissatisfied with the appearance of the image (after
one or more clicks on the image), you can 'reset' the image by
simply clicking on the filename entry field --- to reload the
image from your selected file.
USING THE GENERATED IMAGE:
A screen/window capture utility (like 'gnome-screenshot'
on Linux) can be used to capture the GUI image in a PNG
or GIF file, say.
If necessary, an image editor (like 'mtpaint' on Linux)
can be used to crop the window capture image. The image
could also be down-sized --- say to make a smaller image
suitable for use in a web page or an email.
Happy Magnetizing!"
##+######################################################
##+######################################################
## Additional GUI INITIALIZATION:
## - Put the composite-function strings in the listbox,
## by use of the 'loadnames2listbox' proc above.
##+######################################################
## Set the scale widget var for initial 'radius of influence'
## of 'magnet-clicks' --- Rpx pixels.
set Rpx 50
## Set the scale widget var for initial 'magnet strength factor'
## --- between 0.1 and 10.
set PowerExp 0.5
A FEW MORE EXAMPLES
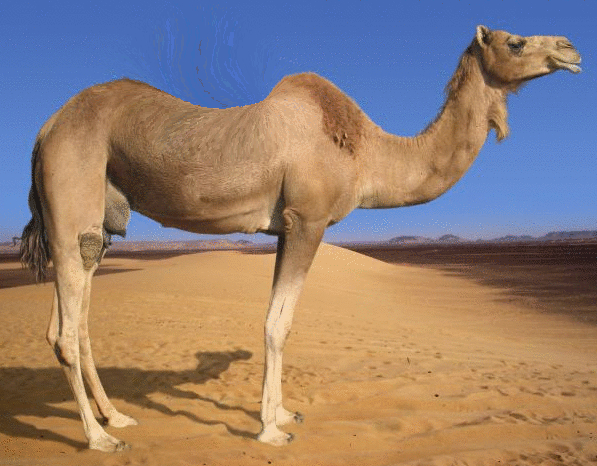
This camel had a hump. I shrank it into a swayback. (You can see traces of the shrinking process on the blue sky. I could have touched that up with the 'mtpaint' image editor, but I left it to show that all is not perfect with the magnet process. In fact, you may find you have more disappointments than successes. But the successes can be quite rewarding.)
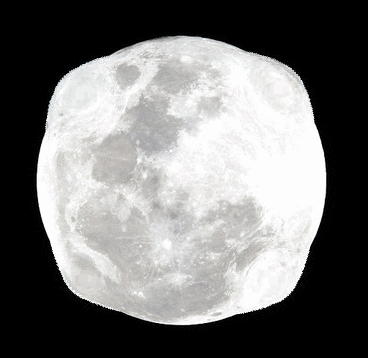
It is a common misconception that the moon is spherical. As you can see in this image, the moon is actually shaped like a couch pillow.

I bulged the top of the Washington Monument so that it now has a sort of bulbous top that looks like alien invader architecture.
SOME POTENTIAL ENHANCEMENTS:
Some other features could be added to this Tk script:
** The ability to use other attract/repel functions. The attract and repel functions built-in to this utility are power (simple monomial) functions --- like 'squared' and 'square-root' functions. Other functions could also be used --- for example, the 'sine' and 'arcsine' functions. The shape of such other functions might provide an opportunity to avoid some crude color-shading effects that result from the current 'power' function implementation. But I may not add any more function types to this utility. (Too many other projects.)
** The ability to swirl, as well as radially attract/repel, could be added. But rather than complicate this script (it generates plenty of image variety, as is), I will probably make a separate 'swirl' utility.
** Provide an option to output a GIF or PNG file, via a 'WriteImg' button. But I am quite happy with the quality of screen captures that I get by using the 'gnome-screenshot' utility on Linux.
** Currently, if you click on a point that is closer to the edge of the canvas than the current 'Radius' setting, no magnet effect takes place. You can usually handle this by using images with a generous margin around the main subject matter. But coding could be done to handle "magnet points" within that outer margin.
IN CONCLUSION
There's a lot to like about a utility that is 'free freedom' --- that is, no-cost and open-source so that you can modify/enhance/fix it without having to wait for someone else to do it for you (which may be never).
I hope to provide more free image-processing scripts that can be used to perform handy operations on images --- or build new images. As I have said on at least one other code-donation page on this wiki ...
A BIG THANK YOU to Ousterhout for starting Tcl-Tk, and a BIG THANK YOU to the Tcl-Tk developers and maintainers who have kept the simply MAH-velous 'wish' interpreter going.
---
Some other 'fun-with-images' scripts that I have donated to this wiki:
* Pointillate Image --- using Tk 'photo' image files (GIF,PGM,PPM,PNG)
* tkMerge2Images - GIF/PNG/JPEG - with image-weighting & image-alignment options
* tkImageGridWarp - GIF/PNG/JPEG/other - using a barymetric technique on triangles